# Welcome
**Welcome to the ThemeWare® Knowledge Base and thank you for choosing ThemeWare®!**
The ThemeWare® documentation for Shopware 6 is based on 3 "pillars":
1. The **Service Portal**
* The Service Portal is always the **first place to go** for all your ThemeWare® needs. It is your personal dashboard for ThemeWare®.
* There you will always find **all the relevant links and information** about ThemeWare®, the ThemeWare® Video Tutorial, the ThemeWare® Utilities, the ThemeWare® Search, the ThemeWare® Config Finder, wizards, promotions, useful tools, feedback and contact forms and much more.
* You can find the Service Portal here: [service.themeware.design/en](https://service.themeware.design/en)
2. The **ThemeWare® Knowledge Base**
* In the ThemeWare® Knowledge Base you will find the **ThemeWare® Introduction**, many **guides** and **tutorials**, the ThemeWare® Lexicon, **answers** to the most frequently asked questions, **solutions** to the most common issues, **professional knowledge** for agencies and freelancers and lots of useful information about Shopware 6.
* You can find the ThemeWare® Knowledge Base here: [knowledge.themeware.design](https://knowledge.themeware.design/)
3. The **ThemeWare® Manual**
* In the ThemeWare® Manual you will find information about all the **features** and **functions** of ThemeWare®.
* You can find the ThemeWare® Manual here: [docs.themeware.design](https://docs.themeware.design)
## The ThemeWare® Knowledge Base
You are currently in the ThemeWare® Knowledge Base. Here you will find an answer to most questions immediately and don't even have to wait for our e-mail.
If you don't find an answer, create a new ticket via our Service Portal. This is the quickest way to get our support.
{% hint style="info" %}
**Note**: As we believe that it is better to start with a few missing translations than not to start at all, we have decided to publish our international Knowledge Base "unfinished".
We are already working intensivelyon the completion and translation of all articles and hope that you will be able to deal with Google Translate or DeepL by then.
Thank you for your understanding.
{% endhint %}
## Shopware 6
The ThemeWare® Knowledge Base primarily contains articles on ThemeWare® features. There are of course several overlaps with features of Shopware 6.
If you need more information about the features of Shopware 6, we recommend you take a look at the [Shopware documentation](https://docs.shopware.com/en/shopware-6-en/getting-started) and the [Shopware](/knowledge-base/shopware) section.
# Introduction
Welcome to the ThemeWare® Introduction
The ThemeWare® Introduction is a written form of the popular ThemeWare® Video Tutorial. As we are currently revising the video tutorial, the introduction is not yet complete, but it is growing bit by bit. If an article is still missing or incomplete, please have a look at the ThemeWare® Video Tutorial.
{% hint style="info" %}
**Note**: The ThemeWare® Video Tutorial and the ThemeWare® Introduction are currently being revised or written and will soon be available in an english version.
{% endhint %}
## ThemeWare® demoshops
The ThemeWare® demoshops present all ThemeWare® themes live and in colour.
### Are there any differences to the freshly installed theme?
For technical reasons, themes do not install categories or Shopping Experiences. You can use the free demo data plugin from Shopware, for example, to import sample products and categories.
We also explain how to create categories and the Shopping Experience on the home page in the free ThemeWare® Video Tutorial and step-by-step PDF instructions.
### Configuration
With ThemeWare® you benefit from extremely regular updates with new features and configurations. To avoid affecting the many ThemeWare® shops of our customers, new features and functions are of course deactivated when they are released. You can therefore decide for yourself whether and if so which new feature you want to use.
However, as we still want to present new features in our demoshops , the demoshops will differ slightly from the default configuration of our theme over time. But don't worry, the demoshops are based entirely on ThemeWare®, you can activate everything we show in the demoshops yourself with just a few clicks.
{% hint style="info" %}
**Note**: Please note that there are, of course, technical differences between the Pro Edition and the Cloud Edition. They concern everything ThemeWare® additionally brings to the administration: the "CMS elements (Shopping Experiences)" as well as the ThemeWare® improvements to the administration such as the ThemeWare® Hub, the Config Finder and the improved presentation of the theme configuration. You can find more information [here](https://service.themeware.design/en/articles/themeware-editions-compared).
{% endhint %}
You can find all the information about our demoshops and configuration in the following article. However, we recommend that you complete the introduction first.
{% content-ref url="/pages/fNNbFFXrVM5YSHkq6GsK" %}
[Demoshops](/knowledge-base/tutorials/demoshops)
{% endcontent-ref %}
# Testing ThemeWare®
In this article you will learn how to test ThemeWare®.
The ThemeWare® rental version includes a free trial month. Feel free to use this option to test different variants before making your final decision. The rental can be cancelled at any time on a monthly basis or is automatically extended at the prices stated at the time of booking.
{% hint style="success" %}
**Tip**: If you purchase extensions in a test domain, you can later transfer the licences to the live domain via your Shopware account. You can find more information about this in the Shopware documentation.
{% endhint %}
## Testing ThemeWare®
1. Open the administration of your shop
2. Switch via the main navigation to the "**Store**" (1) (2) ("Extensions" => "Store")
3. Switch to the tab "**Themes**" (3)
4. *Optional*: Enter "**ThemeWare**" or e.g."Modern" into the search field
5. Now click the ThemeWare® theme you desire in the overview
6. The details page of the ThemeWare® theme will open up now
7. Click the button "**Add theme**" (4)
8. A pop-up will now open
9. Here you can find all the details about the costs after the trial month (5)
10. Please read and accept the **Terms and Conditions** (6)
11. Now confirm the booking with "**Purchase this extension**" (7)
Now you have subscribed to ThemeWare® with a free trial month.
In the next article you will find out how to install ThemeWare®.
#### Screenshots
   
***
## Further information
If you have further questions or any problems, you can find more information in our detailed tutorial: [Testing ThemeWare®](/knowledge-base/tutorials/administration/testing-themeware)
# Installing ThemeWare®
In this article you will learn how to install ThemeWare®.
If you have purchased a Shopware extension via the Shopware Store and you have registered your Shopware account in your shop, you can easily install it via the Extension Management.
{% hint style="success" %}
**Tip**: Log in to your Shopware account in order to access purchased licences: [Registering the Shopware Account in the administration](/knowledge-base/shopware/shopware-account/registering-the-shopware-account-in-the-administration)
{% endhint %}
## Installing ThemeWare®
1. Open the administration of your shop
2. Switch via the main navigation to the "**Extension Management**" (1) (2) ("Extensions" => "My Extensions")
3. Switch to the tab "**Themes**" (3)
4. ThemeWare® is now being displayed in the overview
5. Now install the extension via the option "**Install**". (5)
ThemeWare® has now been installed.
In the next article you will learn how to activate ThemeWare®.
#### Screenshots

***
## Further information
If you have further questions or any problems, you can find more information in our detailed tutorial: [Installing ThemeWare®](/knowledge-base/tutorials/administration/installing-themeware)
# Activating ThemeWare®
In this article you will learn how to activate ThemeWare®.
If you have installed an extension, it is basically "ready for use". In order to be able to use the extension, it must be activated.
## Activating ThemeWare®
1. Open the administration of your shop
2. Switch via the main navigation to "**Extension Management**" (1) (2) ("Extensions" => "My Extensions")
3. Switch to the "**Themes**" tab (3)
4. Activate ThemeWare® via the  **switch button** (4) on the left of the ThemeWare® logo
ThemeWare® has now been activated.
In the next article you will learn how to assign ThemeWare®.
#### Screenshots

***
## Further information
If you have further questions or any problems, you can find more information in our detailed tutorial: [Activating ThemeWare®](/knowledge-base/tutorials/administration/activating-themeware)
# Assigning ThemeWare®
In this article you will learn how to assign ThemeWare®. This means how you make sure that ThemeWare® is represented in your storefront.
First of all, it is important to understand that the basis for delivering a theme is always a Sales Channel. This Sales Channel must be of the type "Storefront" .
If you create a Sales Channel, you can select different types. And "Storefront" would then be the type that is necessary for the theme to be "delivered".
{% hint style="info" %}
Tip: You do not need to create a Sales Channel of the type "Storefront"  if you already have a corresponding Sales Channel.
With the default installation, Shopware usually creates a suitable Sales Channel that is titled with the shop name selected during the installation.
{% endhint %}
## Assigning ThemeWare®
1. Open the administration of your shop
2. Switch via the main navigation to the sales channel of your storefront  in the section "**Sales Channels**" (1)
3. Switch to tab "**Theme**" (2)
4. Now click on the "**Change theme**" button in the "Theme assignment" section (3)
5. Select your ThemeWare® theme in the "Select theme" pop-up (4) and click on the "**Change theme**" button (5)
6. Click on "**Save**" at the top so that the theme will be assigned and compiled (6)
ThemeWare® has now been assigned to your storefront.
#### Screenshots
 
***
## Further information
If you have further questions or any problems, you can find more information in our detailed tutorial: [Activating ThemeWare®](/knowledge-base/tutorials/administration/activating-themeware)
# Downloading ThemeWare® Utilities
In this article you will learn how to get free access to the popular ThemeWare® Utilities for your ThemeWare® theme.
#### ThemeWare® Utilities: Helpful tools and extras for the design of your store
* **Import plugin** for a **professional Shopping Experience** with storytelling elements (Self-hosted)
* **Step-by-step instructions** for a **professional Shopping Experience** with storytelling elements (Cloud)
* All graphics in **open PSD format**
* Logo set with 40 pagespeed optimised graphics for **shipping methods**
* Logo set with 90 pagespeed optimised graphics for **payment methods**
* Graphic sets with various **templates** and **SSL seals**
* **ThemeWare® Customizing Plugin** for individual customisations (Self-hosted)
* **ThemeWare® Customizing App** for individual customisations (Cloud)
* Incl. **11 essential tips** for more orders
* Surprise: small **gift as a thank-you**
{% hint style="info" %}
**Note**: You can also benefit from our new update newsletter and receive information about updates, changes and new features of ThemeWare®.
{% endhint %}
On the following page you will find a form which you can use to request the tools free of charge. These will be sent to you immediately by e-mail and will support you in designing your shop.
{% embed url="" %}
ThemeWare® Utilities
{% endembed %}
{% hint style="success" %}
**Tip**: You can also request the Utilities straight from your administration. The **ThemeWare® Hub** has a "**Utilities**" tab for this – you reach it via the main navigation "**Content**" => "**ThemeWare® {your theme}**". The Hub is part of the ThemeWare® improvements to the administration and is therefore only available in the Pro Edition ([Manual](https://docs.themeware.design/additional-features/hub)).
{% endhint %}
***
## Requesting the ThemeWare® Utilities
1. Select your Shopware version
2. Select your ThemeWare® theme
3. Enter your e-mail address
4. Choose whether you are a shop operator or an agency (freelancer) working for a customer
5. Read and confirm the privacy policy
6. Click on the "Register now for free" button
You have now successfully registered and will receive an e-mail with all the information, download links and more.
{% hint style="success" %}
**Tip**: Check your spam folder if you have not received the e-mail promptly or request the utilities again if in doubt.
{% endhint %}
{% hint style="info" %}
**Note**: The ThemeWare® Utilities are updated from time to time. If you are missing a link, just repeat the registration process to receive the ThemeWare® Utilities e-mail again.
{% endhint %}
# Overview of the theme configuration
In this article we give you an overview of the theme configuration in the theme manager.
The theme manager is the **theme administration** in the administration. You reach it via the main navigation "Content" => "Themes". (**Note**: In the Shopware Cloud you will find the "Themes" area directly in the main navigation.)
In the **theme overview** you will find all installed and activated themes of your system.
Click the theme in question to get to its **theme configuration**.
#### Screenshots
 
## Theme configuration
The ThemeWare® theme configuration differs from the standard theme configuration in Shopware 6. We have integrated a number of useful improvements and improved the presentation of the configuration. (**Note**: In the Shopware Cloud these improvements are currently not possible.)
The ThemeWare® configuration is divided into several levels.
The first level are the **tabs** (1) at the top of the configuration. Here you see the rough structure of the storefront – such as "Header", "Footer", "Content", "Shopping Experiences" and so on.
The next level are the **blocks** (2). These are the expandable cards which group the configuration by individual elements – such as the "Logo", the "Top navigation", the "Cookie permission" and so on.
Within a block the configuration fields are grouped once more into **sections** (3), such as the "Basic configuration", the "Colour configuration", the "Image configuration", the "Font configuration" and so on.
Within these sections you will then find the actual **configuration fields** (4).
#### Screenshots

{% hint style="info" %}
**Note**: In our documentation, in the changelog and in our support replies we always state the path to a setting in exactly this order: Tab => Block => Section => Configuration. An example: Tab "Extensions" => Block "USP bar" => Section "Colour configuration" => "Background colour (Header)".
{% endhint %}
{% hint style="success" %}
**Tip**: Many configuration fields have help texts . These are very important. Always have a look at them, they explain exactly what the individual options or the configuration mean and give you valuable guidance.
{% endhint %}
## The tabs at a glance
In principle the ThemeWare® configuration is divided by tabs into the most important parts of the Shopware 6 storefront of a shop.
It starts with the "**Layout**", which affects the entire shop. Then comes the tab "**Header**", the top area of your storefront. This is followed by the "**Footer**", the bottom area of your shop, which you can configure extensively.
In the tab "**Content**" you will find cross-page content elements such as the "Breadcrumb" or the "Cookie permission". The tab "**Shopping Experiences**" contains configuration fields around the design of your Shopping Experiences.
The tabs "**Listing pages**" and "**Product pages**" contain the configuration for the corresponding page types of your shop.
In addition there are a few special tabs:
First there is the tab "**Widgets**". Here you will find the configuration for the ThemeWare® widgets. Widgets are a feature of ThemeWare® for Shopware 6. They are content elements which can be output at various places in the storefront (for example payment and shipping methods, social icons). The footer, for instance, consists of these widgets. This means that you configure the footer itself in the tab "Footer" and the widgets you use in it in the tab "Widgets".
Second there is the tab "**Extensions**". Here you will find larger and completely independent additional features of ThemeWare® which are usually output at a particular place in the storefront (for example the USP bar).
Finally there is the tab "**Others**". It contains various general configurations for advanced users, beta features and compatibility configurations of the ThemeWare® HC-Architecture®.
## Find configuration
The theme configuration is extensive. If you know what you want to change but not which tab it is in, search for it – with the ThemeWare® Config Finder.
It exists twice: as a [field search engine in the browser](https://config.themeware.design/en) and right inside the theme manager. In the browser you look things up, in the theme manager you change them straight away. The next article shows you how to work with it:
{% content-ref url="/pages/dlWtQDG7qeqazLGfTQZO" %}
[Find configuration](/knowledge-base/introduction/find-configuration)
{% endcontent-ref %}
## Saving the configuration
When you save the configuration, do not be surprised that the theme manager jumps back to the first tab. Unfortunately this is a behaviour of Shopware which we cannot influence. Perhaps it will be fixed with a future Shopware update.
So simply remember which tab you were in. When you switch back to that tab, the corresponding block is always open again.
## Tips for the configuration
Make rather small changes, or few changes at a time. Then save and have a look at the effect in the storefront.
{% hint style="success" %}
**Tip**: Experience shows that many small steps get you to your goal faster.
{% endhint %}
If you proceed slowly and in small steps, you can better keep track of what you edited last, which makes further changes or corrections easier.
Perhaps also save or copy which value you changed and what the previous value was, so that you can simply revert the change if you do not like it.
***
## Further information
{% embed url="" %}
ThemeWare® Video Tutorial
{% endembed %}
# Editing ThemeWare®
In this article you will learn how to edit ThemeWare®, that is, how to configure it.
You edit themes, and therefore ThemeWare®, in the **theme administration**. There are two ways to get there:
1. The first way is to click on "**Content**" and then on "**Themes**". (**Note**: In the Shopware Cloud you will find the "Themes" area directly in the main navigation.)\
You then see all installed themes. Click the theme in question, or ThemeWare®, to get to the theme configuration and edit the theme.
2. The other way is to select your **sales channel**. Then click on the tab "**Theme**" and there on "**Edit theme**". This takes you straight to the theme configuration and you can edit the theme.
## Example
> **Example**: The first thing you notice in the storefront is the **USP bar**. In this example we change the background colour of the USP bar.
Open the administration of your shop
1. Switch via the main navigation to the "**theme administration**" (1) (2) ("Content" => "Themes")
* **Note**: In the Shopware Cloud you will find the "Themes" area directly in the main navigation.
2. Now click on your ThemeWare® theme to start editing
3. The USP bar is an extension, so we switch to the tab "**Extensions**" (3)
4. Scroll down a bit and open the block "**USP bar**" (4)
5. Scroll down a bit further to the section "**Colour configuration**"
6. Clicking the button to the left of the input field "**Background colour (Header)**" opens the "colour picker" (5)
7. We select the colour `#e2f4fd`
8. Save the theme configuration (6)
9. Switch to the storefront and reload the page
You have now changed the background colour of the USP bar.
{% hint style="success" %}
**Tip**: If a change does not take effect in the storefront, refresh the storefront once using the following tutorial: [Refreshing the storefront](/knowledge-base/tutorials/miscellaneous/refreshing-the-storefront)
{% endhint %}
{% hint style="success" %}
**Tip**: You do not have to click your way through the tabs to find a setting. With the Config Finder you simply type "`usp background colour`" and immediately see only the matching configuration fields: [Find configuration](/knowledge-base/introduction/find-configuration)
{% endhint %}
{% hint style="info" %}
**Note**: There is a separate article about the USP bar later on.
{% endhint %}
#### Screenshots

**After**

***
## Further information
If you have further questions or any problems, you can find more information in our detailed tutorial: [Editing ThemeWare®](/knowledge-base/tutorials/administration/editing-themeware)
# Find configuration
In this article you will learn how to quickly find a specific setting in the theme manager.
The ThemeWare® Config Finder is built right into the theme configuration. You type in what you want to change and the theme manager hides everything that does not belong to it. Only the matching configuration fields remain – and you change them right there.
{% hint style="info" %}
**Note**: The Config Finder in the theme manager is part of the ThemeWare® improvements to the theme configuration. These improvements are currently not possible in the Shopware Cloud.
{% endhint %}
## Find configuration
1. Open the theme configuration of your ThemeWare® theme
2. Click the "**Config Finder**" button in the top right
3. Type in what you are looking for – for example "`usp background colour`" (1)
4. The theme manager now only shows the blocks and configuration fields that belong to your search term (2)
5. Tabs without results disappear from the tab bar, the remaining ones show the number of results (3)
6. Switch to the matching tab and change your setting right away
To end the search, click the cross in the search field. As long as the cursor is in the search field, the "**Esc**" key does the same. The full configuration is then back as usual.
#### Screenshots
***
## Search tips
The search starts from two characters and runs along with every keystroke. It is therefore worth narrowing your term word by word: "`usp`" shows you everything about the USP bar, "`usp colour`" noticeably less, "`usp colour background`" only the background colours.
The search covers both the label of a configuration field and its technical name. So if a tutorial, a changelog or a support reply mentions a technical name such as `twt-header-type`, you can find the field with that as well.
If you are looking for a whole block rather than a single field, simply enter its name: on a match in a block heading the Config Finder shows the complete block with all of its configuration fields.
{% hint style="success" %}
**Tip**: If you find nothing, use the shorter word stem. The search checks whether your term is contained in the label – "`image`" therefore also finds "Images" and "Image detail", but not the other way round.
{% endhint %}
***
## Further information
The Config Finder can also be used from the search bar of the administration, so even when you are not in the theme manager at all. You will find this and all further details in the ThemeWare® Manual.
Besides the Config Finder in the administration it is still available as a field search engine in the browser. There you also see the technical name, an example value and the path to the setting for every configuration field:
{% embed url="" %}
ThemeWare® Config Finder
{% endembed %}
#### ThemeWare® Video Tutorial
{% embed url="" %}
ThemeWare® Video Tutorial
{% endembed %}
# Combining themes
{% hint style="info" %}
**Note**: This article is work in progress.
{% endhint %}
In this article you will learn how to combine ThemeWare® themes.
## Example
1. Have a look at the other themes ([demoshops](https://demo.themeware.design/))
2. Install an additional theme with a free trial month
* make sure that both ThemeWare® versions are identical
* the procedure is 100% free of charge (make sure to cancel the additional themes before the trial month ends!)
3. *Optional*: create a backup of your theme configuration
4. Compare the theme configurations
5. Adopt parts of the theme configuration
6. Compile the theme – done!
7. Uninstall the additional theme and delete it completely
{% hint style="success" %}
**Tip**: The **ThemeWare® Hub** has dedicated tabs for steps 3 and 5. In the tab "**Backup**" you secure the configuration of a theme with a single click, in the tab "**Variants**" you bring along the customisations from another ThemeWare® theme via "Take over configuration". You reach the Hub via the main navigation "**Content**" => "**ThemeWare® {your theme}**". The Hub is part of the ThemeWare® improvements to the administration and is therefore only available in the Pro Edition ([Manual](https://docs.themeware.design/additional-features/hub)).
{% endhint %}
# Configuring colours
In this article you will learn how to configure the colours in your shop.
You can configure colours in several places:
* Theme configuration
* Shopping Experiences
* any HTML elements (inline styles)
* Shopware core (very few, not relevant for the design)
Below we show you how to adapt the main colours in the theme configuration to your needs, introduce the colour configuration field and show you possible configuration values.
## Example
You will probably want to adapt the primary colour to your corporate design first.
1. Open the administration of your shop
2. Switch via the main navigation to the "**theme administration**" (1) (2) ("Content" => "Themes")
* **Note**: In the Shopware Cloud you will find the "Themes" area directly in the main navigation.
3. Now click on your ThemeWare® theme to start editing
4. Switch to the tab "**Layout**" (3)
5. Open the block "**Main colours**" (4)
6. As "**Primary colour**" (5) we choose the value `#0e8ed3`
7. In the field "Primary colour (light)" we choose the shade `#6ac5f5`
8. As "Primary colour (dark)" we choose `#0c7ebb`
9. Save the theme configuration
10. Switch to the storefront and reload the page
You have now successfully changed the primary colour.
#### Screenshots

 
{% hint style="info" %}
**Note**: This does not change the colour of the logo or of design elements in banners of the Shopping Experience. Those are graphics which the browser cannot recolour. However, you can download all graphics in PSD format via the ThemeWare® Utilities and adapt them as you like.
{% endhint %}
***
## Further information
* Basic knowledge: You can find more information on the topic "colour configuration" in the article [Color configuration](/knowledge-base/basic-knowledge/color-configuration).
# Configuring fonts
This article is about typography, that is, we show you how to configure the fonts in your shop.
## Example
You configure fonts through the ThemeWare® configuration in the Shopware 6 theme manager of your administration.
> **Example**: In our example we change the font for headlines to the font "Helvetica".
1. Open the administration of your shop
2. Switch via the main navigation to the "**theme administration**" (1) (2) ("Content" => "Themes")
* **Note**: In the Shopware Cloud you will find the "Themes" area directly in the main navigation.
3. Now click on your ThemeWare® theme to start editing
4. Switch to the tab "**Layout**" (3)
5. Open the block "**Typography**" (4)
6. In the section "**Headlines**" change the **Fonttype** to `'Helvetica', sans-serif`
7. Scroll to the section "**Font weight**"
* In our example it is configured as `Light: 400`, `Normal: 400` and `Bold: 600`.
* Select the font weights available in the font you have chosen.
8. Save the theme configuration
9. Switch to the storefront and reload the page
You have now changed the font for the headlines in your storefront.
#### Screenshots

## The ideal approach to configuring fonts
Always configure the font first and only then the font size and the font weight.
Fonts are very individual and depending on the font the size and the weight take effect differently.
{% hint style="success" %}
**Tip**: It makes sense to use a plain, clearly legible font for the text. If you want to use a more ornate font, then at most in the headline.
{% endhint %}
## Font configuration for shop elements
There are a few blocks in the theme configuration (for example the "Top navigation" in the tab "Header" or in the ThemeWare® CMS elements) where you can choose whether you want to use the font configured for "Text" or for "Headlines".

***
## Further information
* Basic knowledge: You can find more information on the topic "font configuration" in the article [Font configuration](/knowledge-base/basic-knowledge/font-configuration)
* Knowledge: Everything about "Google Fonts" is covered in the article [Google Fonts](/more-knowledge/google-fonts)
# Adding your logo
In this article we show you how to add your logo to your online shop, what you should keep in mind and which optimisation options you have.
In this article we assume that you already have a logo for your shop or that you simply use our PSD template.
## Example
Besides the main colours and the font, the logo is one of the shop elements that is essential for your branding and corporate design.
Via the ThemeWare® Utilities you receive a matching logo template in PSD format for your theme.
The easiest way to add the shop logo is directly through the ThemeWare® configuration in the Shopware 6 theme manager of your administration.
> **Example**: In our example we add the ThemeWare® logo to our shop.
1. Open the administration of your shop
2. Switch via the main navigation to the "**theme administration**" (1) (2) ("Content" => "Themes")
* **Note**: In the Shopware Cloud you will find the "Themes" area directly in the main navigation.
3. Now click on your ThemeWare® theme to start editing
4. Switch to the tab "**Layout**" (3)
5. Open the block "**Media**" (4)
6. Click the  **button** (5) to remove the current "Logo @Desktop (≥1200px)"
7. Upload or open the logo
* Via the button "**Upload file**" (6) you can now upload and add your logo
* Via the button "**Open media**" (7) you can select an image you have already uploaded and drag it into the media field by **drag and drop** (8)
8. Repeat steps 6 and 7 for all logos you want to replace
9. Save the theme configuration
10. Switch to the storefront and reload the page
You have now successfully replaced the shop logo.
#### Screenshots
   
{% hint style="success" %}
**Tip**: Simply use our PSD files from the image template download package as a guide, which you receive via the [ThemeWare® Utilities](https://service.themeware.design/en/themeware-utilities).
{% endhint %}
# Configuring the logo
{% hint style="info" %}
**Note**: This article is work in progress.
{% endhint %}
In this article we show you how to configure your shop logo.
## Example
You configure the shop logo through the ThemeWare® configuration in the Shopware 6 theme manager of your administration.
> **Example**: In our example we want to enlarge the logo a little.
1. Open the administration of your shop
2. Switch via the main navigation to the "**theme administration**" (1) (2) ("Content" => "Themes")
* **Note**: In the Shopware Cloud you will find the "Themes" area directly in the main navigation.
3. Now click on your ThemeWare® theme to start editing
4. Switch to the tab "**Header**" (3)
5. Open the block "**Logo**" (4)
6. In the section "**Basic configuration**" select the option "**Image logo**" in the configuration field "**Logo type**" (5)
7. In the section "**Logo type 'Image logo'**" (6) you can configure, for example, the "Width", the "Height", the "Margin top @Desktop (≥992px)" or the "Hover effect" of the shop logo
8. We change the "**Width**" to `240`
9. Save the theme configuration
10. Switch to the storefront and reload the page
You have now configured your shop logo.
#### Screenshots
 
## Sticky top navigation
In the block "**Sticky top navigation (Basic headers: 'Header 1' and 'Header 2')**" you will find the configuration for the logo of the sticky top navigation in the section "**Logo**".
**TODO**: Custom-Header
## Shopping Experience header
The logo for the "Shopping Experience header" has no separate configuration. It merely replaces the actual logo on pages which use the Shopping Experience header.
**TODO**: ...
# Configuring the text logo
If you would like to use a pure text logo, ThemeWare® of course offers a convenient option for that as well.
## Example
You configure the text logo through the ThemeWare® configuration in the Shopware 6 theme manager of your administration.
> **Example**: In our example we activate the text logo in the ThemeWare® configuration.
1. Open the administration of your shop
2. Switch via the main navigation to the "**theme administration**" (1) (2) ("Content" => "Themes")
* **Note**: In the Shopware Cloud you will find the "Themes" area directly in the main navigation.
3. Now click on your ThemeWare® theme to start editing
4. Switch to the tab "**Header**" (3)
5. Open the block "**Logo**" (4)
6. In the section "**Basic configuration**" select the option "**Text logo**" in the configuration field "**Logo type**" (5)
7. In the section "**Logo type 'Text logo'**" (6) you can configure, for example, the "Logo text", the "Font family", the "Font size" or the "Text colour" of the text logo
8. We change the "**Text colour**" to `#0c7ebb`
9. Save the theme configuration
10. Switch to the storefront and reload the page
You have now configured the text logo.
#### Screenshots

# Configuring the shop navigation
The shop navigation (main navigation) is the category navigation in the header. You create the categories in Shopware, ThemeWare® defines the display.
## Step 1: Create the categories
1. Open the administration of your shop
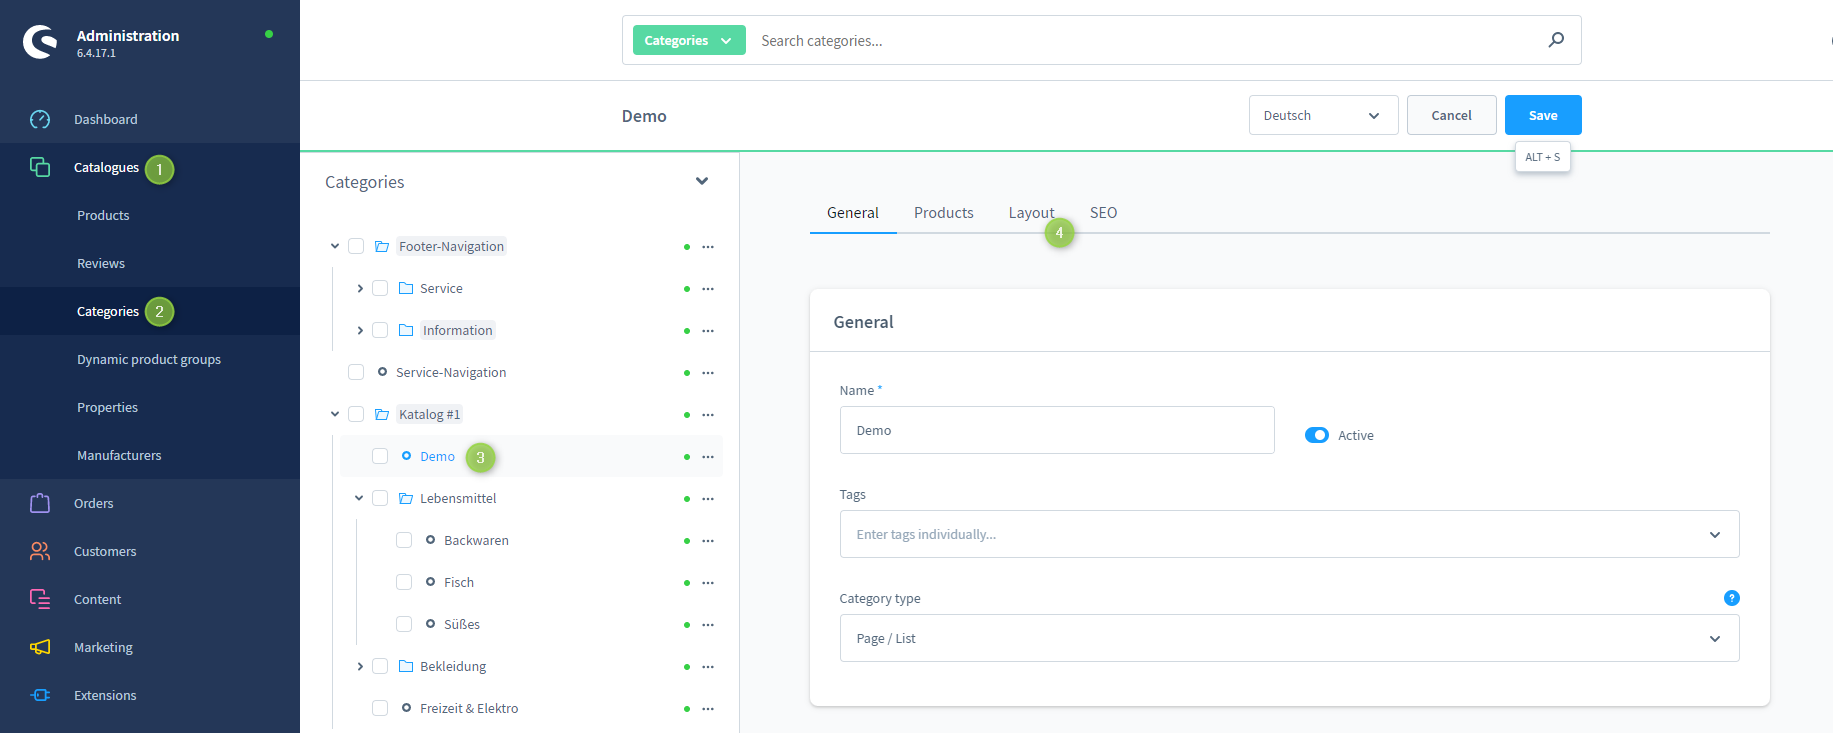
2. Switch via the main navigation to "**Catalogues**" => "**Categories**"
3. Create your categories and subcategories
* Category type "**Page / List**": a category with associated products and a layout
* Category type "**Structuring element / Entry point**": only used for outlining purposes and not callable by itself
* Category type "**Link**": a reference to a product, another category, a landing page or an external site
4. Make sure that all categories are set to "**Active**"
5. Save your categories
## Step 2: Check the entry point in the Sales Channel
1. Open your Sales Channel via the main navigation
2. Switch to the tab "**General**"
3. Check the field "**Entry point main navigation**" in the card "**Navigation**"
4. Define with the "**Navigation levels**" how many category levels are loaded
5. Save the Sales Channel
{% hint style="warning" %}
**Attention**: The "Navigation levels" of the Sales Channel are the upper limit. Categories below that level are not loaded into the storefront at all and therefore cannot be displayed by ThemeWare® either.
{% endhint %}
## Step 3: Configure the top navigation
1. Switch via the main navigation to the "**theme administration**" ("Content" => "Themes")
* **Note**: In the Shopware Cloud you will find the "Themes" area directly in the main navigation.
2. Now click on your ThemeWare® theme to start editing
3. Switch to the tab "**Header**"
4. Open the block "**Top navigation**"
5. Select at "**Top navigation**" how the navigation is displayed:
* "**don't show**"
* "**show list**"
* "**show hamburger menu**"
6. In the section "**Basic configuration**" you configure among others "**Show home link**", "**Show arrows**", the "**Hover effect**" and the "**Height**"
7. In the sections "**Colour configuration**" and "**Typography**" you adjust colours, font family, font size and text formatting
## Step 4: Configure the submenus (flyout)
1. Open the block "**Top navigation flyout**"
2. Select at "**Top navigation flyout**" the display of the submenus:
* "**Shopware default**"
* "**ThemeWare® Flyout**"
* "**ThemeWare® Dropdown**"
* "**ThemeWare® Flyout with cards**"
* "**ThemeWare® Flyout with sidebar**"
* "**ThemeWare® Flyout with teasers**"
3. In the section "**Basic configuration**" define with the "**Navigation levels**" how many category levels are displayed
4. In the section "**Design**" you select the desired design for the "**Flyout**" and the "**Dropdown navigation**"
{% hint style="success" %}
**Tip**: Each category can override the global setting "Top navigation flyout" individually via the category custom field "Top navigation flyout".
{% endhint %}
## Step 5: Mobile navigation
You configure the mobile navigation separately:
* Tab "**Content**" => Block "**Offcanvas navigation**"
## Step 6: Save and check
1. Save the theme configuration
2. Switch to the storefront and reload the page
You have now configured the shop navigation.
***
## Further information
* Introduction: [Configuring the service navigation](/knowledge-base/introduction/configuring-the-service-navigation)
* Introduction: [Adapting the design of the category page](/knowledge-base/introduction/adapting-the-design-of-the-category-page)
# Editing texts in the theme
Snippets - editing texts in the theme
Almost all texts of ThemeWare® are snippets. You can change and translate them at any time without touching a single line of code. Snippets are a basic function of Shopware.
## Editing texts
1. Open the administration of your shop
2. Switch via the main navigation to "**Settings**" => "**Shop**" => "**Snippets**"
3. Select the desired snippet set (usually "BASE en-GB")
4. Search for the text you want to change
5. Adjust the snippet
6. Save your change
7. Switch to the storefront and reload the page
{% hint style="success" %}
**Tip**: The own snippets of ThemeWare® start with `twt.`. If you search for this prefix, you will see them at a glance. Besides that ThemeWare® also uses and extends snippets of Shopware.
{% endhint %}
## Jumping directly from the theme configuration
Many configurations in the theme configuration name the matching snippet directly in the help text, for example for the service menu or the USP bar. Use the link in the help text to jump directly to the snippet.
### Remark
If you cannot find a text, try varying the search term. It may be that some texts contain hyperlinks whose HTML code then "disturbs" the search term.
**Example**: Let us assume that you are looking for a snippet of the USP bar and that the text in the storefront reads "Excellent support".
It may be that you find the snippet directly, but it may also be that the snippet contains a link: for example `Excellent support`.
In this case a search for `Excellent support` would not lead to a result. If you search only for "Excellent" instead, you will find the snippet.
{% hint style="info" %}
**Note**: If your change is not displayed, clear the Shopware cache and your browser cache once.
{% endhint %}
#### Further information
For more information on texts, snippets and translations, see the following tutorial:
{% content-ref url="/pages/RVprdegGe8fgDnbMTXCy" %}
[Texts: Edit and translate](/knowledge-base/tutorials/texts-editing-and-translation)
{% endcontent-ref %}
# Configuring the USP bar
The USP bar is a bar with your most important selling points, for example "Free shipping" or "30 day money back guarantee". It can be displayed in the header and in the footer.
## Step 1: Activate the USP bar
1. Open the administration of your shop
2. Switch via the main navigation to the "**theme administration**" ("Content" => "Themes")
* **Note**: In the Shopware Cloud you will find the "Themes" area directly in the main navigation.
3. Now click on your ThemeWare® theme to start editing
4. Switch to the tab "**Extensions**"
5. Open the block "**USP bar**"
6. Activate "**Show USP bar in header**" and/or "**Show USP bar in footer**"
## Step 2: Configure the display
The section "**Basic configuration**" offers among others:
* "**Position (Header)**" and "**Position (Footer)**": where the bar is output
* "**Layout type (Header)**" and "**Layout type (Footer)**": for example with small or large icons
* "**Show subtitle (Large icons)**"
* "**Height (Small icons)**" and "**Height (Large icons)**"
* "**Benefit alignment (Small icons)**" and "**Benefit alignment (Large icons)**"
* "**Content (Widget)**": an additional widget in the USP bar
You configure the colours in the section "**Colour configuration**", fonts and icon sizes in the section "**Typography**".
## Step 3: Control the benefits per viewport
In the section "**USPs**" you define for every benefit from which viewport it is displayed ("**Show benefit #1 from...**" and following). This way you only show the most important points on small screens.
## Step 4: Edit texts and icons
You maintain the content of the USP bar with snippets:
| Snippet | Content |
| ------------------------------------ | ------------------------------- |
| `twt.extension.uspBar.usp1.title` | The text of the first benefit |
| `twt.extension.uspBar.usp1.icon` | The icon of the first benefit |
| `twt.extension.uspBar.usp1.subtitle` | The subtitle (with large icons) |
| `twt.extension.uspBar.usp1.tooltip` | An optional tooltip |
For the other benefits use `usp2`, `usp3` and so on accordingly.
{% hint style="info" %}
**Note**: If you do not want to output a benefit at all, set the field "**Show benefit #X from...**" in the section "**USPs**" to "**don't show**". An empty snippet does not hide the benefit.
{% endhint %}
#### Shopware 6 icons
You will find an overview of all Shopware 6 icons via the following link. In the theme configuration and in snippets of ThemeWare® you can use the icons from the pack "default".
{% embed url="" %}
Shopware 6 icons
{% endembed %}
***
## Further information
* Introduction: [Editing texts in the theme](/knowledge-base/introduction/editing-texts-in-the-theme)
# Understanding Shopping Experiences
Shopping Experiences are the modular content system of Shopware 6 (CMS). With it you design pages freely, without any programming knowledge. ThemeWare® extends this system with numerous additional blocks and elements.
## The structure of a Shopping Experience
| Level | Meaning |
| ----------- | -------------------------------------------------------------------------------------- |
| **Layout** | The entire Shopping Experience, with a layout type (for example "Shop page") |
| **Section** | A horizontal area within the layout, either full width or with a sidebar |
| **Block** | A building block within a section, for example an image text block or a product slider |
| **Element** | The actual content within a block, for example an image, a text or a product slider |
## The layout types
When creating a Shopping Experience you select the "**Layout type**". It defines what the layout can be used for:
* "**Shop page**": for pages such as "About us", "Contact" or "Shipping and payment"
* "**Landing page**": for campaign and promotion pages
* "**Listing page**": for categories including the product listing
* "**Product page**": for product detail pages
{% hint style="info" %}
**Note**: You can change the layout type afterwards in the layout settings. The layout type "Product page" is an exception, it cannot be changed anymore.
{% endhint %}
## Creating a Shopping Experience
1. Open the administration of your shop
2. Switch via the main navigation to "**Content**" => "**Shopping Experiences**"
3. Click on "**Create new layout**"
4. Select the "**Layout type**" and a starting layout
5. Enter a "**Layout name**"
6. Build your layout from sections, blocks and elements
7. Save the layout
## Assigning layouts
A layout only becomes visible once you assign it. The assignment always takes place at the respective object:
| Layout type | Assignment |
| ------------ | ----------------------------------------------------------- |
| Shop page | At a category of the type "Page / List" in the tab "Layout" |
| Landing page | At the landing page in the tab "Layout" |
| Listing page | At the category in the tab "Layout" |
| Product page | At the product in the tab "Layout" |
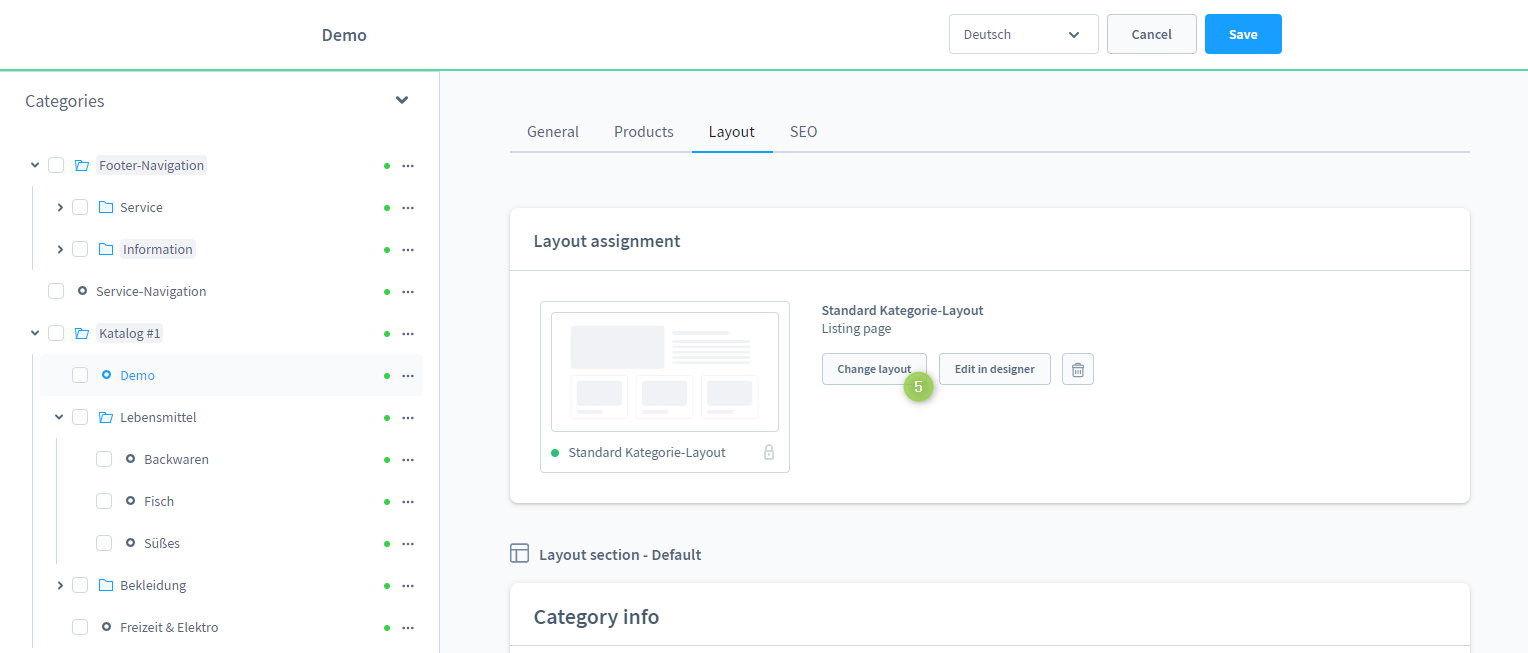
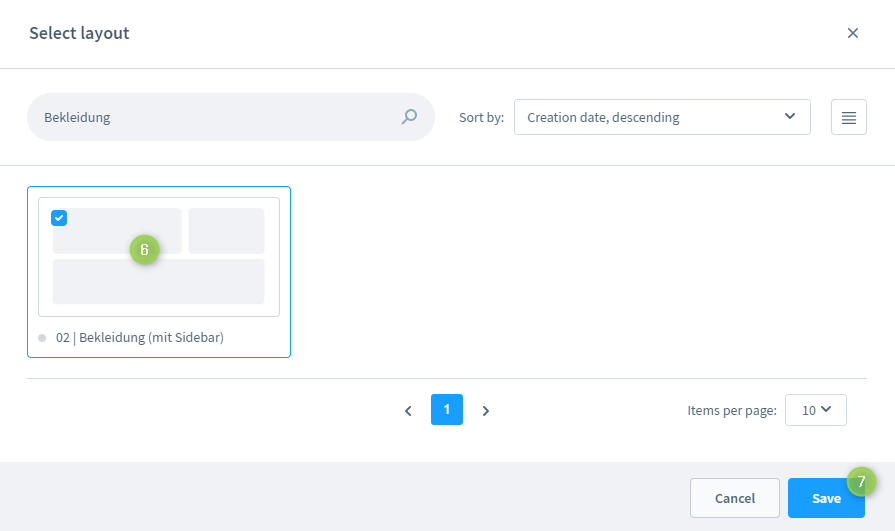
Use the button "**Assign layout**" or "**Change layout**" to select the desired layout.
{% hint style="success" %}
**Tip**: A layout can be assigned several times. If you change the layout, all pages that use it change as well.
{% endhint %}
## ThemeWare® blocks and elements
When editing a Shopping Experience you will find the categories of ThemeWare® next to the Shopware categories in the block selection:
* ThemeWare® General
* ThemeWare® Category teasers
* ThemeWare® Banners
* ThemeWare® Columns
* ThemeWare® Grids
* ThemeWare® Text & images
* ThemeWare® Listing page
* ThemeWare® Product page
* ThemeWare® Sale
* ThemeWare® Sidebar
* ThemeWare® Other
## Configuring Shopping Experiences in the theme
You will find the general settings for Shopping Experiences in the theme configuration:
* Tab "**Shopping Experiences**" => Block "**All types (Shop pages, Landing pages, Listing pages, Product pages)**": spacings and CSS scroll animations
* Tab "**Shopping Experiences**" => Block "**ThemeWare® CMS styling**": here you define among others whether the "**ThemeWare® CMS styling**" is loaded for CMS shop pages, CMS landing pages, CMS listing pages and CMS product pages, and configure spacings, background and border colours of CMS sections and CMS blocks
There are additional separate blocks for individual ThemeWare® blocks, for example "**Image slider (Category 'Images')**", "**Image gallery (Category 'Images')**" or "**Product slider (Category 'Commerce')**".
***
## Further information
* Introduction: [Setting up the home page (ThemeWare® Shopping Experience)](/knowledge-base/introduction/startseite-themeware-erlebniswelt-einrichten)
* Introduction: [Editing and creating shop pages](/knowledge-base/introduction/editing-and-creating-shop-pages)
# ThemeWare® Demoshops
The ThemeWare® demo shops present all ThemeWare® themes live and in colour.
## Home page
In the upcoming article, you can find more information on how to configure the home page of your theme. In this article, we briefly explain the configuration differences between the Demoshops and the default configuration of ThemeWare®.
## Configuration
With ThemeWare® you benefit from extremely regular updates with new features and configurations. To avoid affecting the many ThemeWare® shops of our customers, new features and functions are of course deactivated when they are released. You can therefore decide for yourself whether and if so which new feature you want to use.
However, as we still want to present new features in our Demoshops, the Demoshops will differ slightly from the default configuration of our theme over time. But don't worry, the Demoshops are based entirely on ThemeWare®, you can activate everything we show in the Demoshops yourself with just a few clicks.
{% hint style="info" %}
**Note**: Please note that there are, of course, technical differences between the Pro Edition and the Cloud Edition. However, these relate entirely to the topic "CMS elements (Shopping Experiences)". You can find more information [here](https://service.themeware.design/en/articles/themeware-editions-compared).
{% endhint %}
You can find all the information about our Demoshops and configuration in the following article. However, we recommend that you complete the introduction first.
{% content-ref url="/pages/fNNbFFXrVM5YSHkq6GsK" %}
[Demoshops](/knowledge-base/tutorials/demoshops)
{% endcontent-ref %}
# Setting up the home page (ThemeWare® Shopping Experience)
{% hint style="info" %}
**Note**: This article is work in progress.
{% endhint %}
With ThemeWare® and ThemeWare® Utilities you get everything you need for your first Shopping Experience:
You will get a **free import plugin** with which you can import the Shopping Experience of your theme into your shop (self-hosted) with just a few clicks.
As a Shopware Cloud user, you will get a **step-by-step guide in PDF format** on how to create the Shopping Experience for your theme.
Furthermore, you will get **all the required graphic templates** in open PSD format.
{% embed url="" %}
ThemeWare® Utilities
{% endembed %}
...
{% hint style="info" %}
**Note**: With Shopware 6.5, an **HTML sanitizer** has been implemented. This sanitizer improves security, reliability and usability of the editor by removing unsafe HTML code.
It also sanitizes styles and attributes for consistent and correct code rendering regardless of platform and browser. (see [HTML Sanitizer](/knowledge-base/profi-knowledge/html-sanitizer))
{% endhint %}
...
# Adapting the design of the category page
Category pages (listing pages) show your products in a listing. ThemeWare® gives you extensive options to adapt their design, from the number of columns to the content of every product box.
## Step 1: Select the layout type
The layout type of the product boxes is defined in the Shopping Experience of the category page.
1. Open the administration of your shop
2. Switch via the main navigation to "**Content**" => "**Shopping Experiences**"
3. Open the layout of your category page (layout type "**Listing page**")
4. Select the element "**Product listing**"
5. Select the "**Layout type**" of the product boxes:
* "**Standard**"
* "**Big image**"
* "**Minimal content**"
6. Save the layout
{% hint style="info" %}
**Note**: The selected layout type defines which ThemeWare® configuration block applies to the product boxes.
{% endhint %}
## Step 2: Define the number of columns
1. Switch via the main navigation to the "**theme administration**" ("Content" => "Themes")
* **Note**: In the Shopware Cloud you will find the "Themes" area directly in the main navigation.
2. Now click on your ThemeWare® theme to start editing
3. Switch to the tab "**Listing pages**"
4. Open the block that matches your layout type:
* "**Layout (Layout type 'Standard')**"
* "**Layout (Layout type 'Big image')**"
* "**Layout (Layout type 'Minimal content')**"
5. In the section "**Columns per row**" you define the number of products per row for every viewport
6. In the section "**Columns per row (with Sidebar)**" you do the same for pages with a sidebar
## Step 3: Adapt the product box
* Tab "**Listing pages**" => Block "**Product box**"
In the section "**Basic configuration**" you will find among others:
* "**Layout type**": "Border colour (default)" or "Drop shadow"
* "**Hover effect**"
* "**Text alignment**"
* "**Compact product box**"
In the section "**Content**" you define which information is displayed, for example "**Show product description**", "**Show manufacturer**", "**Show product number**", "**Show variant characteristics**", "**Show price unit**" or "**Show list price**".
The sections "**Colour configuration**" and "**Typography**" contain the colours and fonts of the product box.
## Step 4: Configure the product badges
* Tab "**Listing pages**" => Block "**Product badges (in the product box)**"
## Step 5: Save and check
1. Save the theme configuration
2. Switch to the storefront and reload the page
***
## Further information
* Introduction: [Understanding Shopping Experiences](/knowledge-base/introduction/understanding-shopping-experiences)
* Introduction: [Configuring the shop navigation](/knowledge-base/introduction/configuring-the-shop-navigation)
# Editing and creating shop pages
Shop pages are content pages without a product listing, for example "About us", "Contact", "Shipping and payment" or "Imprint". They consist of a Shopping Experience with the layout type "Shop page" and a category to which this Shopping Experience is assigned.
## Step 1: Create the Shopping Experience
1. Open the administration of your shop
2. Switch via the main navigation to "**Content**" => "**Shopping Experiences**"
3. Click on "**Create new layout**"
4. Select the layout type "**Shop page**" and a starting layout
5. Enter a "**Layout name**", for example "About us"
6. Build the page from sections, blocks and elements
7. Save the layout
## Step 2: Create the category
The page needs a category so that it can be reached in the shop.
1. Switch via the main navigation to "**Catalogues**" => "**Categories**"
2. Create a new category, for example "About us"
* It makes sense to create it below your footer or service navigation
3. In the card "**General**" select the option "**Page / List**" for the "**Category type**"
4. Activate the category with the switch "**Active**"
5. Save the category
## Step 3: Assign the layout
1. Open the category
2. Switch to the tab "**Layout**"
3. Click on "**Assign layout**" and select your Shopping Experience
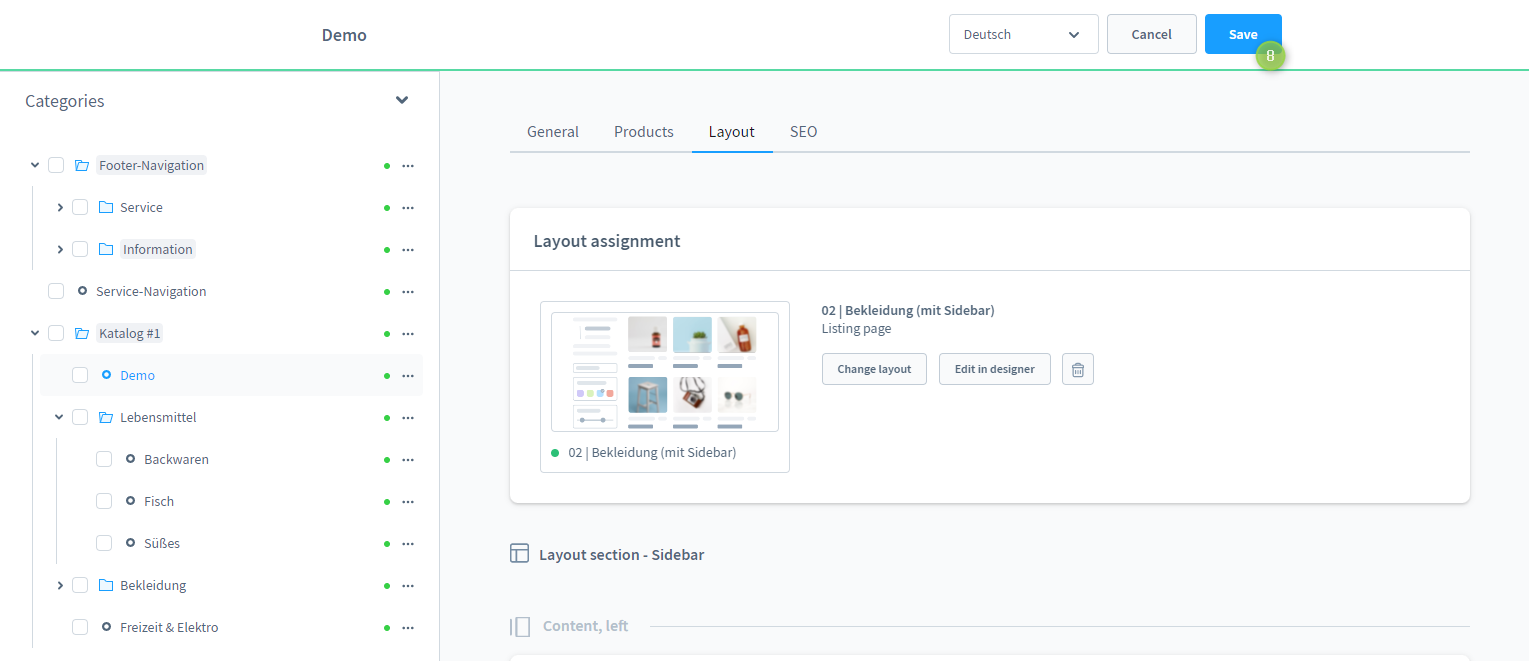
4. Save the category
{% hint style="info" %}
**Note**: Alternatively you can link the layout with one or more categories directly in the Shopping Experience via the layout assignment.
{% endhint %}
## Step 4: Link the page
So that your customers find the page, link it in a navigation:
* [Configuring the footer navigation](/knowledge-base/introduction/configuring-the-footer-navigation) for the columns in the footer
* [Configuring the service navigation](/knowledge-base/introduction/configuring-the-service-navigation) for the service links
## Step 5: Display in the theme
You configure the overall display of the CMS content in the theme configuration:
* Tab "**Shopping Experiences**" => Block "**ThemeWare® CMS styling**" => "**Load ThemeWare® CMS styling (CMS shop pages)**"
* Tab "**Shopping Experiences**" => Block "**All types (Shop pages, Landing pages, Listing pages, Product pages)**" for spacings and CSS scroll animations
***
## Further information
* Introduction: [Understanding Shopping Experiences](/knowledge-base/introduction/understanding-shopping-experiences)
# Configuring the service navigation
The service navigation is a second navigation in the footer area, typically with entries such as "Help", "Contact" or "Shipping and payment". Shopware calls it "Footer service navigation".
You create the navigation itself in Shopware via categories and assign it to your Sales Channel. The ThemeWare® configuration then controls where and how it is displayed.
## Step 1: Create the categories
1. Open the administration of your shop
2. Switch via the main navigation to "**Catalogues**" => "**Categories**"
3. Create a new category on the top level, for example "Service"
* In the card "**General**" select the option "**Structuring element / Entry point**" for the "**Category type**"
4. Create the individual entries below this category, for example "Help", "Contact", "Shipping and payment"
* Category type "**Page / List**": a separate page with an assigned layout (Shopping Experience)
* Category type "**Link**": a reference to a product, another category, a landing page or an external site
5. Make sure that all categories are set to "**Active**"
6. Save your categories
{% hint style="info" %}
**Note**: Only the categories on the level directly below are displayed in the service navigation.
{% endhint %}
## Step 2: Assign the entry point
So that Shopware knows which category is the service navigation, it has to be assigned as an entry point. There are two ways to do this, the result is identical.
#### Option A: via the category
1. Open the category "Service"
2. Open the card "**Navigation**"
3. Select the option "**Footer service navigation**" for the "**Entry point**"
4. Select your Sales Channel under "**Sales Channel assignment**"
5. Save the category
#### Option B: via the Sales Channel
1. Open your Sales Channel via the main navigation
2. Switch to the tab "**General**"
3. In the card "**Navigation**" select your category "Service" in the field "**Entry point footer service navigation**"
4. Save the Sales Channel
## Step 3: Configure the display in ThemeWare®
ThemeWare® can output the service navigation in several places.
1. Open the administration of your shop
2. Switch via the main navigation to the "**theme administration**" ("Content" => "Themes")
* **Note**: In the Shopware Cloud you will find the "Themes" area directly in the main navigation.
3. Now click on your ThemeWare® theme to start editing
4. Configure the desired areas:
#### Footer
* Tab "**Footer**" => Block "**Copyright footer**" => Section "**Basic configuration**" => "**Show service navigation until...**"
* Here you define up to which viewport the service navigation is displayed in the footer.
#### Top bar
* Tab "**Header**" => Block "**Top bar**" => Section "**Service menu \[Pro Edition]**" => "**Show service menu**"
* You can choose between "don't show", "show as dropdown" and "show as list".
{% hint style="info" %}
**Note**: Shopware has removed the service menu in the header with version 6.5 and provides this only as "Footer service navigation". With this configuration you can display it in the top bar again.
{% endhint %}
#### Offcanvas navigation
* Tab "**Content**" => Block "**Offcanvas navigation**" => Section "**Service menu \[Pro Edition]**" => "**Show service menu**"
* This way the service navigation additionally appears in the mobile navigation.
5. Save the theme configuration
6. Switch to the storefront and reload the page
You have now set up the service navigation.
## Adjusting the label
You can edit or translate the label of the service menu with the snippet `header.indexLinkService`.
***
## Further information
* Introduction: [Editing texts in the theme](/knowledge-base/introduction/editing-texts-in-the-theme)
# Configuring the footer navigation
The footer navigation is the multi-column navigation in the footer, for example with the columns "Service", "Information" or "About us".
You create the navigation itself in Shopware via categories and assign it to your Sales Channel. In the ThemeWare® configuration you then define where it is output in the footer and how it looks.
## Step 1: Create the categories
1. Open the administration of your shop
2. Switch via the main navigation to "**Catalogues**" => "**Categories**"
3. Create a new category on the top level, for example "Footer"
* In the card "**General**" select the option "**Structuring element / Entry point**" for the "**Category type**"
4. Create the **columns** below this category, for example "Service", "Information", "About us"
* The category type "**Structuring element / Entry point**" makes sense here as well
5. Create the individual **links** below each column, for example "Contact", "Shipping and payment", "Terms and conditions"
* Category type "**Page / List**": a separate page with an assigned layout (Shopping Experience)
* Category type "**Link**": a reference to a product, another category, a landing page or an external site
6. Make sure that all categories are set to "**Active**"
7. Save your categories
{% hint style="info" %}
**Note**: The categories on the level directly below become columns, the category name is output as the column headline. All categories below that appear as rows within the column.
{% endhint %}
## Step 2: Assign the entry point
There are two ways to do this, the result is identical.
#### Option A: via the category
1. Open the category "Footer"
2. Open the card "**Navigation**"
3. Select the option "**Footer navigation**" for the "**Entry point**"
4. Select your Sales Channel under "**Sales Channel assignment**"
5. Save the category
#### Option B: via the Sales Channel
1. Open your Sales Channel via the main navigation
2. Switch to the tab "**General**"
3. In the card "**Navigation**" select your category "Footer" in the field "**Entry point footer navigation**"
4. Save the Sales Channel
## Step 3: Place the footer navigation in the theme
In ThemeWare® the footer navigation is a widget that you assign to one of the footer elements.
1. Switch via the main navigation to the "**theme administration**" ("Content" => "Themes")
* **Note**: In the Shopware Cloud you will find the "Themes" area directly in the main navigation.
2. Now click on your ThemeWare® theme to start editing
3. Switch to the tab "**Footer**"
4. Open the block "**Assigning and arranging content**"
5. In a free section (for example "**Element 1**") select the option "**Footer navigation**" for the "**Content (Widget)**"
6. Define the "**Section**" (for example "Main section") and the "**Order**"
7. Save the theme configuration
## Step 4: Adjust the appearance
* Tab "**Widgets**" => Block "**Footer navigation**"
* In the section "**Basic configuration**" you configure the "**List-style**" and the "**Padding left (list with marker)**"
* In the section "**Colour configuration**" the "**Link colour**", the "**Link colour @hover**", the "**Marker colour (list with marker)**" and the "**Border-bottom colour**"
* In the section "**Typography**" the "**Text formatting**" and whether "**Underline links**" is active
Afterwards save the theme configuration and reload the storefront once.
***
## Further information
* Introduction: [Configuring the footer](/knowledge-base/introduction/configuring-the-footer)
* Introduction: [Configuring the service navigation](/knowledge-base/introduction/configuring-the-service-navigation)
# Configuring the footer
The footer of ThemeWare® has a modular structure. You decide which content (widgets) appears in the footer, in which section it is placed and in which order it is output.
## Structure of the footer
| Section | Content |
| -------------------- | ------------------------------------------------------------------------------- |
| **Upper section** | First zone for widgets, for example newsletter or benefits |
| **Main section** | Main zone for widgets, for example footer navigation, about us, service hotline |
| **Lower section** | Third zone for widgets, for example payment and shipping methods |
| **Logos footer** | Separate area below, for example for awards |
| **Copyright footer** | Bottom line with copyright, service navigation and branding |
{% hint style="info" %}
**Note**: A reduced footer is output in the checkout. You configure it in the block "Minimal footer (in the Checkout)".
{% endhint %}
## Step 1: Define the columns
1. Open the administration of your shop
2. Switch via the main navigation to the "**theme administration**" ("Content" => "Themes")
* **Note**: In the Shopware Cloud you will find the "Themes" area directly in the main navigation.
3. Now click on your ThemeWare® theme to start editing
4. Switch to the tab "**Footer**"
5. Open the block "**Layout**"
6. In the section "**Columns**" define the "**Number of columns @Tablet (≥768px)**" and the "**Number of columns @Desktop (≥1200px)**"
## Step 2: Assign and arrange the content
1. Open the block "**Assigning and arranging content**"
2. Here you will find the sections "**Element 1**" to "**Element 11**", each with the same configurations:
* "**Content (Widget)**": the widget that is output in this place
* "**Section**": "Upper section", "Main section" or "Lower section"
* "**Order**": the sorting within the section (a lower number comes first)
* "**Element width**": the width of the element
* "**Mobile view**": the behaviour in the mobile view (for example collapsible)
3. Set the "**Content (Widget)**" of the elements you do not need to "**don't show**"
The following widgets are available:
* About us
* Awards, seals or certificates
* Benefits
* Communities or social media
* Custom text
* Footer navigation
* Service hotline
* Location or retail store
* Newsletter
* Payment and shipping methods
* Payment methods
* Revocation
* Shipping methods
{% hint style="success" %}
**Tip**: You configure the content of the widgets themselves in the tab "**Widgets**". There you will find a separate block for every widget.
{% endhint %}
## Step 3: Adjust the appearance
The blocks "**Upper section**", "**Main section**", "**Lower section**" and "**Copyright footer**" each offer the same sections:
* "**Basic configuration**": paddings and margins, alignment of the columns
* "**Colour configuration**": text, link and background colours
* "**Background image**": your own background image including image size, position, repeat and attachment
* "**Typography**": text alignment
You will find the overall settings (background colour, background image, font families and font sizes of the entire footer) in the block "**Layout**".
## Step 4: Save and check
1. Save the theme configuration
2. Switch to the storefront and reload the page
You have now configured the footer.
***
## Further information
* Introduction: [Configuring the footer navigation](/knowledge-base/introduction/configuring-the-footer-navigation)
* Introduction: [Configuring the service navigation](/knowledge-base/introduction/configuring-the-service-navigation)
* Introduction: [Payment and shipping provider logos](/knowledge-base/introduction/payment-and-shipping-provider-logos)
# Payment and shipping provider logos
ThemeWare® can output the logos of your payment and shipping methods in the footer and on the product page. The logos come directly from the payment and shipping methods of Shopware.
## Step 1: Store the logos in Shopware
#### Payment methods
1. Open the administration of your shop
2. Switch via the main navigation to "**Settings**" => "**Payment methods**"
3. Open a payment method
4. Store an image from your media library in the field "**Logo**"
5. Save the payment method and repeat the process for all other payment methods
#### Shipping methods
1. Switch via the main navigation to "**Settings**" => "**Shipping**"
2. Open a shipping method
3. Store an image in the field "**Upload logo**"
4. Save the shipping method and repeat the process for all other shipping methods
{% hint style="info" %}
**Note**: Only payment and shipping methods that are assigned to your Sales Channel and are active are output.
{% endhint %}
## Step 2: Place the widget in the footer
1. Switch via the main navigation to the "**theme administration**" ("Content" => "Themes")
* **Note**: In the Shopware Cloud you will find the "Themes" area directly in the main navigation.
2. Now click on your ThemeWare® theme to start editing
3. Switch to the tab "**Footer**"
4. Open the block "**Assigning and arranging content**"
5. In a free section (for example "**Element 1**") select one of the following options for the "**Content (Widget)**":
* "**Payment methods**"
* "**Shipping methods**"
* "**Payment and shipping methods**" (both logo groups in one element)
6. Define the "**Section**" and the "**Order**"
## Step 3: Configure the display of the logos
* Tab "**Widgets**" => Block "**Payment logos**" or "**Shipping logos**"
The section "**Basic configuration**" offers among others:
* "**Maximum height**": limits the height of the logos
* "**Corner type**": the corner shape of the logos
* "**Link logos**": links the logos
* "**Show fallback badges**": outputs the name as a badge if no logo is stored for a payment or shipping method
* "**Show only custom images**": ignores the logos from Shopware and outputs only your own images
In the section "**Colour configuration**" you configure the "**Coloration**", the "**Border colour**" and the colours of the fallback badge.
## Using your own logos
If you want to output logos for which there is no payment or shipping method (for example a buyer protection seal), use the custom images.
* Tab "**Widgets**" => Block "**Payment logos**" or "**Shipping logos**" => Section "**Images**" => "**Custom image 1**" to "**Custom image 3**"
{% hint style="success" %}
**Tip**: You can edit the titles and alt texts of the custom images with the snippets `twt.widget.payment.customImage1.title` and `twt.widget.shipping.customImage1.title` (accordingly for image 2 and 3).
{% endhint %}
## Logos on the product page
You can additionally output the payment logos in the buy box of the product page.
* Tab "**Product pages**" => Block "**Payment logos (in the buy box)**"
***
## Further information
* Introduction: [Configuring the footer](/knowledge-base/introduction/configuring-the-footer)
# Multilingualism with ThemeWare®
ThemeWare® is delivered with German and English snippets. Multilingualism itself is a basic function of Shopware, ThemeWare® integrates into it.
## Step 1: Set up the language
1. Open the administration of your shop
2. Switch via the main navigation to "**Settings**" => "**Shop**" => "**Languages**"
3. Create the desired language or check the existing languages
## Step 2: Configure the Sales Channel
1. Open your Sales Channel via the main navigation
2. Switch to the tab "**General**"
3. Assign all languages that should be available in the shop under "**Languages**"
4. Define the "**Default language**"
5. Create a separate domain URL for every language in the area "**Domains**"
* Select the "**Language**" and the matching "**Snippet**" set for every domain
6. Save the Sales Channel
{% hint style="warning" %}
**Attention**: Every language needs its own domain in the Sales Channel. Without a domain the language cannot be reached in the storefront.
{% endhint %}
## Step 3: Translate the content
You translate categories, products, landing pages and Shopping Experiences directly at the respective record. Use the language selection at the top of the form to switch the language and maintain the translation.
## Step 4: Translate the texts of the theme
All texts of ThemeWare® are available as snippets and are translated per snippet set.
1. Switch via the main navigation to "**Settings**" => "**Shop**" => "**Snippets**"
2. Select the desired snippet set
3. Search for the text and adjust it
You will find a detailed tutorial in the article [Texts: Edit and translate](/knowledge-base/tutorials/texts-editing-and-translation).
## Step 5: Show the language selection in the shop
So that your customers can switch the language, display the language selection:
* Tab "**Header**" => Block "**Top bar**" => Section "**Language menu**" => "**Show language menu**"
* Tab "**Content**" => Block "**Offcanvas navigation**" => Section "**Language menu**" for the mobile navigation
The section "**Language menu**" additionally offers the options "**Load flag icons**", "**Load extended flag icons**" and "**Shopware Language Pack**".
## What is not translated
{% hint style="info" %}
**Note**: The theme configuration applies per Sales Channel and is not language-dependent. Colours, images and also texts that you enter directly in the theme configuration (for example the "Logo text") are therefore identical in all languages. Texts that should be translatable are maintained with snippets.
{% endhint %}
***
## Further information
* Tutorial: [Texts: Edit and translate](/knowledge-base/tutorials/texts-editing-and-translation)
* Introduction: [Editing texts in the theme](/knowledge-base/introduction/editing-texts-in-the-theme)
# Using more than one ThemeWare® theme
{% hint style="info" %}
**Note**: This article is work in progress.
{% endhint %}
You can absolutely use more than one ThemeWare® theme in your shop. It is also possible to use the Pro Edition and the Cloud Edition at the same time.
{% hint style="warning" %}
**Important**: Make sure that all ThemeWare® themes in your shop always have the same version number so that they work as intended!
{% endhint %}
### Particularities
#### Duplicate content in the theme configuration
...
#### Custom fields
...
#### CMS blocks and CMS elements
If you use more than one ThemeWare® theme in your shop, every CMS block and every CMS element exists only once in the administration, even if they are displayed several times. The blocks and elements then keep working until you deactivate the last ThemeWare® theme.
# Purchasing ThemeWare®
In this article you will learn how to purchase ThemeWare® after the trial month has expired.
The ThemeWare® rental version includes a free trial month. The rental can be cancelled at any time on a monthly basis.
At the end of the trial month, ThemeWare® is automatically extended at the prices stated at the time of booking.
# Getting support
If you have any questions or problems, our popular **ThemeWare® Service Portal** is available around the clock. There you will find all the links to ThemeWare®, useful tools, answers to the most frequently asked questions, solutions to every known problem and news about ThemeWare® and Shopware 6.
The Service Portal is therefore **always the first point of contact** for all matters relating to ThemeWare®:
{% embed url="" %}
ThemeWare® Service Portal
{% endembed %}
### ThemeWare® Hub
The **ThemeWare® Hub** is even faster: it brings the Service Portal right into your administration, so you do not have to leave your shop at all. You reach it via the main navigation "**Content**" => "**ThemeWare® {your theme}**".
The "**Support**" tab bundles:
* the **live chat** for questions without any waiting time
* all self-help sources: Knowledge Base, Manual, Shopware documentation, video tutorial, Config Finder, frequently asked questions and the update guide
* **Create a ticket**, **Improvement suggestion** and **Complaint**
* our **Services** as well as news, changelog and the compatibility overview
{% hint style="info" %}
**Note**: The ThemeWare® Hub is part of the ThemeWare® improvements to the administration and is therefore only available in the Pro Edition. You will find all details in the [Manual](https://docs.themeware.design/additional-features/hub).
{% endhint %}
### ThemeWare® Support
Thanks to thousands of tickets, we have already answered most of the questions and most of the bugs have long been known and solved. So that all customers can benefit from this knowledge, we have documented our knowledge in the **ThemeWare® Knowledge Base**, the **ThemeWare® Manual** and the **ThemeWare® Video Tutorial**.
In addition, you can find almost all information about Shopware 6 in the **Shopware Documentation**.
This allows you to solve almost all questions and problems yourself without having to wait for our answer.
* [ThemeWare® Knowledge Base](https://knowledge.themeware.design/)
* [ThemeWare® Manual](https://docs.themeware.design/)
* ThemeWare® Video Tutorial (translation will follow)
* [Shopware Documentation](https://docs.shopware.com/en)
If you still need support, you can open a ticket via the **ThemeWare® Service Portal** or directly via your **Shopware Account** to get quick help.
#### Get support
1. Have a look at the [Shopware Documentation](https://docs.shopware.com/en)
2. Check the [Shopware Issue Tracker](https://issues.shopware.com/) for problems/errors
3. Have a look at the ThemeWare® Documentation
* ThemeWare® Video Tutorial (translation will follow)
* [ThemeWare® Knowledge Base](https://knowledge.themeware.design/)
* [ThemeWare® Manual](https://docs.themeware.design/)
4. Use the ThemeWare® Search to search the entire ThemeWare® documentation
5. Optional: **ThemeWare® Service Portal**
1. Go to the Service Portal: [service.themeware.design/en](https://service.themeware.design/en)
2. Click on "Request support" in the blue navigation (at the top of the screen)
3. Scroll to the "Create a ticket" section
4. Open the "Request ThemeWare® support" tab
6. **Shopware Account**
1. Log in to your [Shopware Account](https://account.shopware.com/)
2. Switch to the "Merchant" area
3. Open the section "Support"
4. Click on "Request Support" at the top right of the navigation bar
5. Select your shop
6. Select the option "Extension Support"
7. Select the extension for which you require support
{% embed url="" %}
ThemeWare® Support
{% endembed %}
We answer all tickets as quickly as possible. If you do not receive an answer within 24 hours, there was probably a technical problem with your enquiry. Just try again.
{% hint style="success" %}
**Tip**: Make sure to submit your reply address correctly. Unfortunately it happens occasionally that answers cannot be delivered.
{% endhint %}
***
### Estimate of effort and cost from our ThemeWare® experts
If you need an estimate of effort and cost from our ThemeWare® experts for an individual Shopware design, landing page designs, individual customisations or other Shopware services, always use the ThemeWare® Service Portal:
{% embed url="" %}
ThemeWare® services at a glance
{% endembed %}
***
### Wishes, suggestions, feedback or criticism
Do you have an idea for a feature that is still missing and from which many other shop operators would benefit as well? Are you unhappy with ThemeWare® or with one of our services? Do you have wishes or feedback on articles or videos? Then let us know!
We are always happy to receive suggestions and hints that help us improve our products even further.
Every piece of feedback is reviewed and answered by our developers. We are also happy to inform you as soon as your feedback has made its way into ThemeWare®.
{% embed url="" %}
Suggestion for improvement (feature request)
{% endembed %}
***
#### Further information
{% embed url="" %}
Shopware documentation: Merchant Support
{% endembed %}
# Updates and news
One of the biggest advantages of ThemeWare® is its continuous development. You regularly receive new features, sales-promoting features, updates, improvements and, of course, fixes.
{% hint style="success" %}
**Tip**: Have a regular look at the "[News and Announcements](https://service.themeware.design/en/news)" page in our Service Portal to stay informed about news and upcoming changes!
{% endhint %}
There are several ways to find out which changes you can look forward to in which release:
## The ThemeWare® Hub
The most convenient way is to stay up to date right inside your administration. The **ThemeWare® Hub** has two dedicated tabs for this: "**News**" with the news and announcements, and "**Changelog**" with the complete version history of your theme. You reach the Hub via the main navigation "**Content**" => "**ThemeWare® {your theme}**".
{% hint style="info" %}
**Note**: The ThemeWare® Hub is part of the ThemeWare® improvements to the administration and is therefore only available in the Pro Edition. You will find all details in the [Manual](https://docs.themeware.design/additional-features/hub).
{% endhint %}
## The ThemeWare® Newsletter
The ThemeWare® Update Newsletter is part of the ThemeWare® Utilities. So you won't miss any more news!
{% embed url="" %}
Helpful tools and extras for the design of your store
{% endembed %}
## The ThemeWare® Changelog
The ThemeWare® theme changelog can be found on the Shopware store page of your theme in the "Changes" tab:
And also in the "Changelogs" section of the ThemeWare® Service Portal:

***
## Update guidelines ⭐
Our update guide explains step by step how to carry out Shopware and ThemeWare® updates safely:
{% content-ref url="/pages/pa86MQfTMtizBIpoKzSG" %}
[Update guide](/knowledge-base/basic-knowledge/update-guide)
{% endcontent-ref %}
# Tutorials
Here you will find many helpful tutorials to ThemeWare® for Shopware 6.
Before you start with our tutorials, we recommend you take a look at our [Video Tutorial](https://service.themeware.design/en/themeware-tutorial) and the [Introduction](/knowledge-base/introduction). There you can learn all the important basics which will help you a lot with the guides.
In addition, we strongly recommend that you take a look at the official **Shopware documentation**, because many of the things you configure in the guides relate to some of Shopware's core features:
{% embed url="" %}
Shopware 6
{% endembed %}
# Administration
# Testing ThemeWare®
In this tutorial you will learn how to test ThemeWare® for Shopware 6.
The ThemeWare® rental version includes a **free trial month**. The rental can be cancelled at any time on a monthly basis or is automatically extended at the prices stated at the time of booking.
1. Open the administration of your shop
2. Switch via the main navigation to the "**Store**" (1) (2) ("Extensions" => "Store")
3. Switch to the tab "**Themes**" (3)
4. *Optional*: Enter "**ThemeWare**" or e.g."Modern" into the search field
5. Now click the ThemeWare® theme you desire in the overview
6. The details page of the ThemeWare® theme will open up now
7. Click the button "**Add theme**" (4)\

8. A pop-up will now open
9. Here you can find all the details about the costs after the trial month (5)
10. Please read and accept the **Terms and Conditions** (6)
11. Now confirm the "booking" with "**Subscribe to extension**" (7)\

Now you have subscribed to ThemeWare® with a free trial month.
{% hint style="success" %}
**Tip**: Install ThemeWare® next: [Installing ThemeWare®](/knowledge-base/tutorials/administration/installing-themeware)
{% endhint %}
#### Screenshots
   
***
#### Further information
{% hint style="info" %}
**Note**: Purchased extensions appear automatically in the Extension Management. A manual upload is not necessary.
After the purchase you can install themes directly from the details page, but we recommend to go via the Extension Management.
{% endhint %}
{% hint style="success" %}
**Tip**: If you purchase extensions for a test domain, you can later transfer the licences to the live domain via your Shopware account. You can find more information on this in the Shopware documentation.
{% endhint %}
{% hint style="success" %}
**Info**: There is no dedicated "**trial version**" of ThemeWare®. Technically, you are always testing the full version of ThemeWare® with the full range of features.
**Any configuration you make during the trail month will remain after that.**
{% endhint %}
{% hint style="warning" %}
**Important**: In order to use the store in the administration you have to consider the following items:
1. Register your shop in your Shopware account: [Setting up the shop in the Shopware Account](/knowledge-base/shopware/shopware-account/setting-up-the-shop-in-the-shopware-account)
2. Connect your Shopware account with the shop administration: [Linking up the Shopware Account with the shop](/knowledge-base/shopware/shopware-account/linking-up-the-shopware-account-with-the-shop)
3. Log in with your Shopware account in the administration: [Registering the Shopware Account in the administration](/knowledge-base/shopware/shopware-account/registering-the-shopware-account-in-the-administration)
{% endhint %}
# Buying ThemeWare®
In this tutorial you will learn how to buy ThemeWare® for Shopware 6.
{% hint style="info" %}
**Note**: Shopware changed the billing options for extensions in the store on 28 December 2023. Extensions can now only be rented: [Renting ThemeWare®](/knowledge-base/tutorials/administration/renting-themeware)
{% endhint %}
# Renting ThemeWare®
In this tutorial you will learn how to rent ThemeWare® for Shopware 6.
The ThemeWare® rental version includes a free trial month. The rental can be cancelled at any time on a monthly basis or is automatically extended at the prices stated at the time of booking.
1. Open the administration of your shop
2. Switch via the main navigation to the "**Store**" (1) (2) ("Extensions" => "Store")
3. Switch to the tab "**Themes**" (3)
4. *Optional*: Enter "**ThemeWare**" or e.g. "Outdoor" into the search field
5. Now click onto the desired ThemeWare® theme in the overview
6. The details page of the ThemeWare® themes will now open up
7. Click on the button "**Add theme**" (4)\

8. A pop-up will open now
9. Here you can find all the details about the costs after the trial month (5)
10. Please read and accept the **Terms and Conditions** (6)
11. Now confirm the "booking" with "**Subscribe to extension**" (7)\

Now you have subscribed to ThemeWare®.
{% hint style="success" %}
**Tip**: Install ThemeWare® next: [Installing ThemeWare®](/knowledge-base/tutorials/administration/installing-themeware)
{% endhint %}
#### Screenshots
   
***
#### Further information
{% hint style="info" %}
**Note**: Purchased extensions appear automatically in the Extension Management. A manual upload is not necessary.
After the purchase you can install themes directly from the details page, but we recommend to go via the Extension Management.
{% endhint %}
{% hint style="success" %}
**Tip**: If you purchase extensions for a test domain, you can later transfer the licences to the live domain via your Shopware account. You can find more information on this in the Shopware documentation.
{% endhint %}
{% hint style="warning" %}
**Important**: In order to use the store in the administration you have to consider the following items:
1. Register your shop in your Shopware account:[Setting up the shop in the Shopware Account](/knowledge-base/shopware/shopware-account/setting-up-the-shop-in-the-shopware-account)
2. Link up your Shopware account with the shop administration: [Linking up the Shopware Account with the shop](/knowledge-base/shopware/shopware-account/linking-up-the-shopware-account-with-the-shop)
3. Log in with your Shopware account in the administration: [Registering the Shopware Account in the administration](/knowledge-base/shopware/shopware-account/registering-the-shopware-account-in-the-administration)
{% endhint %}
# Uploading ThemeWare®
In this tutorial you will learn how to upload ThemeWare® for Shopware 6.
First of all, we would like to point out that purchased extensions automatically appear in the Extension Management. A manual upload is therefore not necessary.
The manual upload of extensions is possible in two ways:
* Upload via the [Extension Management](#1-extension-management) (recommended)
* Upload via [FTP](#2-ftp)
***
## 1) Extension Management
1. Open the administration of your shop
2. Switch via the main navigation to the "**Extension Management**" (1) (2) ("Extensions" => "My Extensions")
3. Switch to the tab "**Themes**" (3)
4. Click the button "**Upload extension**" (4)\

ThemeWare® is now being uploaded.
{% hint style="success" %}
**Tip**: Install ThemeWare® next: [Installing ThemeWare®](/knowledge-base/tutorials/administration/installing-themeware)
{% endhint %}
#### Screenshots
Uploading ThemeWare®
***
## 2) FTP
{% hint style="info" %}
**Note**: Uploading via FTP is possible, but **we recommend using the Shopware Extension Management**. When uploading extensions via FTP, it can happen that file permissions get messed up and an extension no longer works or cannot be updated or uninstalled.
{% endhint %}
{% content-ref url="/pages/b6YT5rFT2AwOdczpFiO6" %}
[Uploading ThemeWare® via FTP](/knowledge-base/profi-knowledge/uploading-themeware-via-ftp)
{% endcontent-ref %}
# Installing ThemeWare®
In this tutorial you will learn how to install ThemeWare® for Shopware 6.
1. Open the administration of your shop
2. Switch via the main navigation to the "**Extension Management**" (1) (2) ("Extensions" => "My Extensions")
3. Switch to the tab "**Themes**" (3)
4. ThemeWare® is now being displayed in the overview
5. Now install the extension via the option "**Install**". (5)
ThemeWare® has now been installed.
{% hint style="success" %}
**Tip**: Activate ThemeWare® next: [Activating ThemeWare®](/knowledge-base/tutorials/administration/activating-themeware)
{% endhint %}
#### Screenshots

***
#### Further information
{% hint style="warning" %}
**Note**: Your extensions will automatically appear in the extensions management of your shop if you have observed the following points:
1. Register your store in your Shopware account: [Setting up the shop in the Shopware Account](/knowledge-base/shopware/shopware-account/setting-up-the-shop-in-the-shopware-account)
2. Connect your Shopware account to the shop administration: [Linking up the Shopware Account with the shop](/knowledge-base/shopware/shopware-account/linking-up-the-shopware-account-with-the-shop)
3. Log in with your Shopware account in the administration: [Registering the Shopware Account in the administration](/knowledge-base/shopware/shopware-account/registering-the-shopware-account-in-the-administration)
{% endhint %}
# Activating ThemeWare®
In this tutorial you will learn how to activate ThemeWare® for Shopware 6
1. Open the administration of your shop
2. Switch via the main navigation to "**Extension Management**" (1) (2) ("Extensions" => "My Extensions")
3. Switch to the "**Themes**" tab (3)
4. Activate ThemeWare® via the  **switch button** (4) on the left of the ThemeWare® logo
5. Clear the entire Shopware cache and reload the administration
ThemeWare® has now been activated.
{% hint style="success" %}
**Tip**: Assign ThemeWare® to your storefront next: [Assigning ThemeWare®](/knowledge-base/tutorials/administration/assigning-themeware)
{% endhint %}
#### Screenshots

# Assigning ThemeWare®
In this tutorial you will learn how to assign ThemeWare® for Shopware 6 to a sales channel.
The theme configuration of ThemeWare® can be achieved in two possible ways:
1. Via the corresponding [**Sales channel**](#1.-sales-channel) (recommended)
2. Via the [**Theme configuration**](#2.-theme-configuration)
In the following we show you both ways in detail.
{% hint style="info" %}
**Note**: A "storefront" sales channel is always required for the delivery of a theme. How to create an another sales channel, you will learn here: [Sales channel](/knowledge-base/shopware/configuration/sales-channel)
{% endhint %}
***
## 1. Sales channel
1. Open the administration of your shop
2. Switch via the main navigation to the sales channel of your storefront in the section "**Sales Channels**" (1)
3. Switch to tab "**Theme**" (2)
4. Now click on the "**Change theme**" button in the "Theme assignment" section (3)
5. Select your ThemeWare® theme in the "Select theme" pop-up (4) and click on the "**Change theme**" button (5)
6. Click on "**Save**" at the top so that the theme will be assigned and compiled (6)
ThemeWare® has now been assigned to your storefront.
#### Screenshots
 
{% hint style="success" %}
**Tip**: Now start editing ThemeWare®: [Editing ThemeWare®](/knowledge-base/tutorials/administration/editing-themeware)
{% endhint %}
***
## 2. Theme configuration
1. Open the administration of your shop
2. Switch via the main navigation to the "\*\*Theme Management \*\*" (1) (2) ("Content" => "Themes")
* **Note**: In the Shopware Cloud, you will find the section "Themes" right in the main navigation.
3. Now click onto your ThemeWare® theme in order to start editing
4. You will automatically be in the tab "**General**" (3)
5. Now select in the dropdown "**Assigned to the following Sales Channels**" (4) next to the theme preview image your sales channel of type "**Storefront**" (5)
6. Click on the button "**Save**" at the top (6)
7. A pop-up will appear asking once again if you really want to make the change respectively change the current assignment. Just click on "**Save**" here
ThemeWare® has now been assigned to your storefront.
#### Screenshots
 
{% hint style="success" %}
**Tip**: Now start editing ThemeWare®: [Editing ThemeWare®](/knowledge-base/tutorials/administration/editing-themeware)
{% endhint %}
# Editing ThemeWare®
In this tutorial you will learn how to configure ThemeWare® for Shopware 6.
The theme configuration of ThemeWare® can be reached in two ways:
1. Via [**Theme Management**](#1.-theme-management) (recommended)
2. Via the corresponding [**Sales channel**](#2.-sales-channel)
In the following we will show you both ways in detail.
***
## 1. Theme Management
1. Open the administration of your shop
2. Switch via the main navigation to "**Theme Management**" (1) (2) ("Content" => "Themes")
* **Note**: In the Shopware Cloud, you will find the "Themes" section directly in the main navigation.
3. Now click on your ThemeWare® theme, to start editing(3)
4. Save your changes after editing in order to transfer them to the storefront
#### Screenshots

***
## 2. Sales channel
1. Open the administration of your shop
2. Switch via the main navigation to the sales channel of your storefront  in the section "**Sales Channels**" (1)
3. Switch to the tab "**Theme**" (2)
4. Now click on the button "**Edit theme**" in the section "Theme assignment" (3)
5. Save your changes after editing so that they are transferred to the storefront
#### Screenshots

***
#### Further information
{% hint style="info" %}
**Note**: If a change in the storefront does not have an effect, please update the storefront once with the following instructions: [Refreshing the storefront](/knowledge-base/tutorials/miscellaneous/refreshing-the-storefront)
{% endhint %}
# Resetting ThemeWare®
In this tutorial you will learn how to reset the configuration of ThemeWare® for Shopware 6.
1. Open the administration of your shop
2. Switch via the main navigation to "**Theme Management**" (1) (2) ("Content" => "Themes")
* **Note**: In the Shopware Cloud, you will find the "Themes" section directly in the main navigation.
3. Now click on your ThemeWare® theme to open the theme configuration
4. In the Tab "**General**", scroll to the section with the assignment of your theme
5. Click on the  **Context-Button** (3) top right to open a context menu
6. Select the option "**Reset to default**" (4)
7. A pop-up "Reset theme" appears
8. Reset the theme configuration with the button "**Reset to default**" (5)
#### Screenshots
Resetting ThemeWare®
***
### Manual approach (for experienced users)
Experienced users can reset the configuration manually via the database. You can find a tutorial on how to do this in the following article:
{% content-ref url="/pages/hk2ucZj6KvwKzwFlF0cX" %}
[Resetting the ThemeWare® configuration](/knowledge-base/profi-knowledge/resetting-the-themeware-configuration)
{% endcontent-ref %}
# Rating ThemeWare®
In this tutorial you will learn how to rate ThemeWare® for Shopware 6.
We are always happy to receive an honest rating. The rating does not have to be long, 1-2 sentences are sufficient.
{% hint style="success" %}
**Tip**: If you like to give us feedback, you can always submit suggestions for improvement or a complaint using our [Service Portal](https://service.themeware.design/en). We will respond to any feedback.
{% endhint %}
There are two methods of rating ThemeWare®:
1. Using your [**Shopware Account**](#1.-shopware-account) (recommended)
2. Using your [**Shop administration**](#2.-shop-administration)
{% hint style="info" %}
**Note**: The rating via the Shopware account is more detailed and therefore more constructive than a rating via the store administration.
{% endhint %}
In the following we show you both methods in detail.
***
## 1. Shopware Account
1. Log in to your [Shopware account](https://account.shopware.com/)
2. Switch to the "**Merchant Area**" (1) via the selection field in the upper left.
3. In the navigation, click "**Shops**" (2)
4. Now choose the shope for which you have tested, purchased or rented the extension
5. Scroll down to the"**Licenslist**"
6. Now click the extension you want to rate
7. At the top right you will find the link "**Rate**" (3)
8. In the following pop-up you will be able to make your rating
9. Enter your **name** (4), a headline or **summary** (5) for your rating and the your review or **description** (6)
10. Please rate the **functionality**, **usability**, **documentation** and **support** (7) of ThemeWare® by using the 5 stars
11. Confirm the **Terms and Conditions** (8)
12. Send the rating by clicking "**Submit Rating**" (9)
#### Screenshots
 
***
## 2. Shop administration
1. Open the administration of your shop
2. Switch via the main navigation to the"**Extension Management**" (1) (2) ("Extensions" => "My Extensions")
3. Switch to the tab "**Themes**" (3)
4. Click the  **Context-Button** (4) next to the theme to open the context menu and click on "**Rate**" (5)
5. In the following pop-up you will be able to do your rating
6. Enter a **headline** (6) for your rating and your **review** (8)
7. Please rate ThemeWare® using the 5 stars in the section **Rating** (7)
8. Confirm the **Terms and Conditions** (9) and submit the rating clicking "**Submit**" (10)
#### Screenshots
 
# Updating ThemeWare®
In this tutorial you will learn how to update ThemeWare® for Shopware 6.
1. Open the administration of your shop
2. Switch via the main navigation to the "**Extension Management**"(1) (2) ("Extensions" => "My extensions")
3. Switch to the tab "**Themes**" (3)
4. Find your theme in the list of your extensions
* Click "**Update**" (4) or
* Click onto the  **Context-Button** next to the theme in order to open the context menu and click onto "**Update to x.y.z**" (4)
* :white\_check\_mark: **Tip**: Deactivate the theme before updating, and once it’s deactivated, clear the Shopware cache. [Deactivating ThemeWare®](/knowledge-base/tutorials/administration/deactivating-themeware)
5. Clear the entire Shopware cache and reload the administration
ThemeWare® has now been updated.
{% hint style="warning" %}
**Impotant**: To prevent presentation errors caused by an outdated cache, update the storefront once after a theme update: [Refreshing the storefront](/knowledge-base/tutorials/miscellaneous/refreshing-the-storefront)
{% endhint %}
#### Screenshots
.png?alt=media)
***
## Update guidelines 💡
Always refer to our update guide when updating ThemeWare®:
{% content-ref url="/pages/pa86MQfTMtizBIpoKzSG" %}
[Update guide](/knowledge-base/basic-knowledge/update-guide)
{% endcontent-ref %}
***
#### Further information
{% hint style="success" %}
**Tip**: It is useful to deactivate ThemeWare® before updating a theme: [Deactivating ThemeWare®](/knowledge-base/tutorials/administration/deactivating-themeware)
{% endhint %}
{% hint style="info" %}
**Note**: If no update is shown in the context menu please have a look at the article [ThemeWare® update not available](/knowledge-base/common-issues/administration/themeware-update-not-available).
{% endhint %}
{% hint style="info" %}
**Note**: If the update does not work as described, please take a look at the article [ThemeWare® cannot be updated](/knowledge-base/common-issues/administration/themeware-cannot-be-updated).
{% endhint %}
{% hint style="warning" %}
**Important**: If you want to update Shopware, it is always a good practice to update ThemeWare® before or after the update!
Please have a look at the article [Shopware Updates and ThemeWare®](/knowledge-base/tutorials/administration/shopware-updates-and-themeware).
{% endhint %}
# Cleaning up ThemeWare®
In this tutorial you will learn how to clean up ThemeWare® for Shopware 6 after updates.
With ThemeWare® you benefit from continuous development. From time to time, therefore, we may remove or replace configuration fields.
If "orphaned configuration fields" remain in the configuration, you can remove them as follows:
1. Open the administration of your shop
2. Switch via the main navigation to "**Theme Management**" (1) (2) ("Content" => "Themes")
* **Note**: In the Shopware Cloud, you will find the "Themes" section directly in the main navigation.
3. Now click on your ThemeWare® theme to start editing
4. Click on the dropdown icon at the "**Save**"-Button
5. Save your configuration with the option "**Clean Save**" (4)
ThemeWare® has now been cleaned up.
#### Screenshots

***
#### Further information
{% hint style="info" %}
**Note**: More about "orphaned configuration fields " please find in the article [Orphaned configuration fields](/knowledge-base/tutorials/configuration/orphaned-configuration-fields).
{% endhint %}
# Deactivating ThemeWare®
In this tutorial you will learn how to deactivate ThemeWare® for Shopware 6.
1. Open the administration of your shop
2. Switch via the main navigation to the "**Extension Management**" (1) (2) ("Extensions" => "My Extensions")
3. Switch to the tab "**Themes**" (3)
4. Deactivate ThemeWare® via the  **switch button** (4) on the left of the ThemeWare® logo
* :information\_source: **Note**: To deactivate a theme, it must no longer be assigned to any Sales Channel!
5. Clear the entire Shopware cache and reload the administration
ThemeWare® has now been deactivated.
{% hint style="warning" %}
**Important**: Unlicensed extensions must be completely deleted and may not appear in the plugin manager of your shop!
{% endhint %}
#### Screenshots

***
#### Further information
{% hint style="info" %}
**Note**: In order to deactivate a theme, it must no longer be assigned to a sales channel!
{% endhint %}
{% hint style="info" %}
**Note**: "Deactivating" extensions (plugins, apps or themes) does not delete any data.*(Status: Shopware 6.5.6.0)*
{% endhint %}
{% hint style="success" %}
**Tip**: In case of representation errors in the storefront, it may help to deactivate extensions (plugins, apps or themes) once and then reactivate them.
{% endhint %}
# Uninstalling ThemeWare®
In this tutorial you will learn how to uninstall ThemeWare® for Shopware 6.
1. Open the administration of your shop
2. Switch via the main navigation to the "**Extension Management**" (1) (2) ("Extensions" => "My Extensions")
3. Switch to the tab "**Themes**" (3)
4. Click on the **Context-Button** (4) next to the theme to open the context menu and click on "**Uninstall**" (5)
* :information\_source: **Note**: Deactivate the theme before updating, and once it’s deactivated, clear the Shopware cache. [Deactivating ThemeWare®](/knowledge-base/tutorials/administration/deactivating-themeware)
5. In the following pop-up you have to confirm the uninstallation with the "**Uninstall**" button once again\

6. Clear the entire Shopware cache and reload the administration
ThemeWare® has now been uninstalled.
{% hint style="warning" %}
**Important**: Unlicensed extensions must be completely deleted and may not appear in the plugin manager of your shop!
{% endhint %}
#### Screenshots

***
### Option: Remove all App data permanently
When uninstalling ThemeWare® the option "Remove all app data permanently" can be used. This deletes all ThemeWare® data such as the theme configuration, ThemeWare® duplicates and the ThemeWare® Custom Fields.
Therefore, if you want to remove ThemeWare® residue-free, use this option.
{% hint style="success" %}
**Tip**: If you are not sure whether you want to continue using ThemeWare® after all, or if you are using the uninstallation for debugging, save the data to have it available for a later installation.
{% endhint %}
If this option is **not** being used, all the data will remain in the system and can be used again as soon as you reinstall ThemeWare®.
***
#### Further information
{% hint style="info" %}
**Note**: It makes sene, but is not necessary, to deactivate extensions before uninstalling them.
{% endhint %}
{% hint style="success" %}
**Tip**: Uninstallation can be used to correct errors, in case e.g. write permissions were set incorrectly on the server, for example. In this case, you should not use the option "Remove all App data permanently" !
{% endhint %}
# Deleting ThemeWare®
In this tutorial you will learn how to delete ThemeWare® for Shopware 6.
1. Open the administration of your shop
2. Switch via the main navigation to the "**Extension Management**" (1) (2) ("Extensions"=> "My extensions")
3. Switch to the tab "**Themes**" (3)
4. Click the  **Context-Button** (4) next to the theme in order to open the context menu and click "**Remove**" (5)
5. Log in to the **Shopware Account** within the tab "**Shopware Account**" with your account update your data so that the deletion of the extension is updated in the entire system.
{% hint style="info" %}
**Note**: It is necessary to uninstall extensions before deleting them.
{% endhint %}
#### Screenshots

{% hint style="info" %}
**Note**: If the extension cannot be deleted, it can in most cases be deleted directly via FTP and from the database.
{% endhint %}
***
### Remove license
Extensions with valid licenses will be displayed in the Extension Management even after "removing" them, because the corresponding account still owns this license. You can remove/archiv the license itself in your Shopware Account:
* Go to your Shopware Account at and cancel the rental there. Without this cancellation, the rental contract will continue to be charged.
# Returning ThemeWare®
In this tutorial you will learn how to return ThemeWare® for Shopware 6.
In general, when purchasing extensions (apps, plugins or themes) from the Shopware Store, it always makes sense to install them in advance as a "trial version" in the form of a free trial month. This way you can test the extension for **30 days free of charge** and make sure that it meets your expectations.
If, despite this, you have accidentally purchased an extension incorrectly, please contact our sales department using the contact form.
{% embed url="" %}
Shopware Sales
{% endembed %}
# Determining the ThemeWare® version
In this tutorial you will learn how to determine the version of ThemeWare® for Shopware 6.
1. Open the administration of your shop
2. Switch via the main navigation to the "**Extension Management**" (1) (2) ("Extensions" => "My extensions")
3. Switch to the tab "**Themes**" (3)
4. Read the version number from the entry for ThemeWare® (4)
#### Screenshots

# Shopware Updates and ThemeWare®
In this guide you will learn how to proceed if you need to update Shopware 6 together with ThemeWare® update.
We regularly release updates of ThemeWare®. So most of the ThemeWare® updates you do independently from Shopware updates.
But of course there are also cases where you want to perform a Shopware update. In these cases, it always makes sense to update extensions (plugins, apps or themes) before or after.
{% hint style="info" %}
**Note**: For information on how to update ThemeWare®, see the article [Updating ThemeWare®](/knowledge-base/tutorials/administration/updating-themeware).
{% endhint %}
Whether you need to update extensions before or after the Shopware update depends on the compatibility of the extensions (plugins, apps or themes).
The type of Shopware release must also be taken into account here, as there are different types of Shopware releases:
> **Shopware versioning**
>
> * **Major-Release**
> * Incompatible API changes are made (= breaking changes)
> * z.B. 6.**5** > 6.**6**
> * **Minor-Release**
> * Functionality is added in a backward-compatible manner
> * z.B. 6.5.**1** > 6.5.**2**
> * **Patch-Release**
> * Backward-compatible bug fixes are made
> * z.B. 6.5.1.**1** > 6.5.1.**2**
***
## Compatibility
Basically,ThemeWare® is always compatible with the latest Shopware version or will be released in a compatible version in the short term. Accordingly, there is always a suitable ThemeWare® version for older Shopware versions.
As we test ThemeWare® in every new Shopware release, it can happen – depending on how extensive the necessary adjustments are – that a ThemeWare® update is only released shortly after the Shopware update.
#### Major-Releases
However, it can happen that there is no ThemeWare® version (this applies to all extensions) that is compatible with both the old and the new Shopware version at the same time. This is always the case when Shopware makes so-called "breaking changes" that make compatibility with both versions impossible.
As you can see in the "Shopware versioning" above, "breaking changes" are mainly possible in major releases.
{% hint style="info" %}
**Note**: More information about the topic "Shopware Compatibility" you will find in our article [Shopware Compatibility](/knowledge-base/basic-knowledge/shopware-compatibility).
{% endhint %}
{% hint style="success" %}
**Tip**: You can find more information about possible incompatibilities or information about updates in the [News and announcements](https://service.themeware.design/en/news) block in our Service Portal.
{% endhint %}
{% hint style="warning" %}
**Important**: Please always use the update option of the extension management and do not install extensions manually to avoid installing an incompatible extension.
{% endhint %}
***
## Shopware Update
The Shopware update wizard will inform you if there are incompatible extensions. Incompatible extensions must be deactivated before the Shopware update and should only be activated when a compatible version has been released.
Please find more information on the correct procedure in the following instructions.
{% hint style="info" %}
**Note**: "Deactivating" extensions (plugins, apps or themes) does not delete any data. *(Status: Shopware 6.6)*
{% endhint %}
{% hint style="success" %}
**Tip**: Most of this guide applies to all extensions (plugins, apps or themes), but to simplify matters we refer to ThemeWare®.
{% endhint %}
#### Step-by-step instructions:
Please find below a step-by-step guide for Shopware updates. Basically there are three possible cases:
1. If the current version of ThemeWare® is **compatible with both the current and the new Shopware version**, you can easily update Shopware ([A](#a.-already-compatible)).
2. If the current version of ThemeWare® is **not compatible** with the new Shopware version but there is a **compatible ThemeWare® version for the current and the new Shopware version**, first update ThemeWare® before updating Shopware ([B](#b.-now-avaiable)).
3. If the current version of ThemeWare® is **not compatible** with the new Shopware version but there is **a compatible ThemeWare® version for the new Shopware version**, deactivate ThemeWare®, update Shopware first and then ThemeWare® ([C](#c.-with-new-shopware-version)).
4. If the current version of ThemeWare® is **not compatible** with the new Shopware version and there is currently **no compatible ThemeWare® version**, deactivate ThemeWare®, perform the Shopware update and reactivate ThemeWare® only after you have been able to update it ([D](#d.-not-compatible)).
These three cases are considered in the following instructions:
***
## 1) Preparation
We recommend that you wait a few days/weeks before updating Shopware - especially for major releases of the update.
{% hint style="success" %}
**Tip**: Wait a few days/weeks for the Shopware update, especially for major Shopware releases.
{% endhint %}
Test each update in advance in a test system or a staging environment and check that everything works smoothly.
It is also essential to create a complete backup of your shop before the Shopware update.
{% hint style="success" %}
**Tip**: Create a **complete backup** of your shop before the Shopware update and test **the update** in advance in a test or staging system.
{% endhint %}
Update ThemeWare® and all extensions (plugins, apps or themes) in your system to the latest versions.
{% hint style="warning" %}
**Important**: Update all extensions (plugins, apps or themes) in your system before every Shopware update.
{% endhint %}
Check whether there is already a compatible version for all extensions (plugins, apps or themes) or themes.
It is best to only perform out the Shopware update if you have ensured that all extensions used are installed in a compatible and error-free version.
{% hint style="success" %}
**Tip**: If you want to make sure that ThemeWare® is already compatible, you can check the store page of the corresponding extension in the [Shopware Store](https://store.shopware.com/tc-innovations-gmbh.html?p=1\&o=12\&n=21\&c=1033\&shopwareVersion=6) which versions are currently supported.
{% endhint %}
If you want to perform the Shopware update even if not all extensions used are compatible, leave incompatible extensions deactivated until you have been able to install a compatible version.
{% hint style="warning" %}
**Important**: Deactivate all incompatible extensions before a Shopware update and activate them if you have been able to update them to a compatible version.
{% endhint %}
***
## 2) Shopware Update
There are three options for Shopware updates:
* [#a.-already-compatible](#a.-already-compatible "mention")
* [#b.-now-avaiable](#b.-now-avaiable "mention")
* [#c.-with-new-shopware-version](#c.-with-new-shopware-version "mention")
* [#d.-not-compatible](#d.-not-compatible "mention")
### A. Already compatible
#### ThemeWare® is already compatible with both the current and the new Shopware version:
Already compatible
1. *Optional*:Assign the "Shopware default theme" to your sales channel
2. *Optional*: Then deactivate your ThemeWare® theme
* **Tip**: Clear the entire Shopware cache once
3. *Optional*: Perform a ThemeWare® update
4. Perform the Shopware Update
* **Important**: Only if really *all* extensions are "already compatible"!
5. *Optional*: Activate ThemeWare® again
* **Tip**: Clear the entire Shopware cache once
6. *Optional*: Assign ThemeWare® to your sales channel to complete the process
7. Clear the entire Shopware cache once and reload the administration
{% hint style="info" %}
**Note**: If you were unable to update ThemeWare® to the latest version, take a look at the article [ThemeWare® update not available](/knowledge-base/common-issues/administration/themeware-update-not-available).
{% endhint %}
### B. Now avaiable
#### A compatible ThemeWare® version is available before the Shopware update:

1. Assign the "Shopware default theme" to your sales channel
2. Then deactivate your ThemeWare® theme
* **Tip**: Clear the entire Shopware cache once
3. Perform the ThemeWare® update
4. ThemeWare® now is "already compartible" ([A](#a.-already-compatible))
5. Now perform the Shopware update
* **Important**: Only if really *all* extensions are "already compatible"!
6. Activate ThemeWare® again
* **Tip**: Clear the entire Shopware cache once
7. Assign ThemeWare® to your sales channel to complete the process
8. Clear the entire Shopware cache once and reload the administration
{% hint style="info" %}
**Note**: If you were unable to update ThemeWare® to the latest version, take a look at the article [ThemeWare® update not available](/knowledge-base/common-issues/administration/themeware-update-not-available).
{% endhint %}
### C. With new Shopware version
#### A compatible ThemeWare® version is available after the Shopware update:
With new Shopware version
1. Assign the "Shopware default theme" to your sales channel
2. Then deactivate your ThemeWare® theme
3. Clear the entire Shopware cache once
4. Perform the Shopware update
5. Now perform the ThemeWare® update
6. **Important**: Make sure that your ThemeWare® version is compatible with the current Shopware version: [Shopware Compatibility](https://service.themeware.design/en/shopware-compatibility)
7. Activate ThemeWare® (in the compatible version) again
* **Tip**: Clear the entire Shopware cache once
8. Assign ThemeWare® to your sales channel to complete the process
9. Clear the entire Shopware cache once and reload the administration
{% hint style="danger" %}
**Attention**: Do not activate an incompatible version of an extension in your Shopware shop!
In this scenario, the old ThemeWare® version is not compatible with the new Shopware version and the new ThemeWare® version is not compatible with the old Shopware version.
{% endhint %}
{% hint style="info" %}
**Note**: If you were unable to update ThemeWare® to the latest version, take a look at the article [ThemeWare® update not available](/knowledge-base/common-issues/administration/themeware-update-not-available).
{% endhint %}
### D. Not compatible
#### A compatible ThemeWare® version for the new Shopware version is NOT yet available:

* If there is **no compatible version of ThemeWare® yet** for the new Shopware release, wait with the Shopware update until this is the case.
* If you still want to perform the Shopware update, leave ThemeWare® (or any incompatible extension) deactivated until you have been able to update to a compatible version.
### This extension is not available in the store.
This message is largely self-explanatory. The extension in question is not available in the Shopware Store and therefore cannot be updated automatically. In this case, please update it manually or deactivate it before updating Shopware until compatibility has been checked and confirmed.
***
## Troubleshooting
We hope you have followed the hints regarding the creation of a backup and testing in a staging environment and you can restore your backup or perform a new test.
If this is not the case, deactivate the problematic extension and only activate it once you have been able to update the corresponding extension to a compatible version (see [Shopware Compatibility](/knowledge-base/basic-knowledge/shopware-compatibility#checking-compatibility)).
If the administration is not accessible due to an incompatible extension, deactivate the corresponding extension via the database (see [Deactivating ThemeWare® via the database](/knowledge-base/profi-knowledge/deactivating-themeware-via-the-database)). The administration should then work again.
***
## Update guidelines 💡
Always refer to our update guide when updating ThemeWare®:
{% content-ref url="/pages/pa86MQfTMtizBIpoKzSG" %}
[Update guide](/knowledge-base/basic-knowledge/update-guide)
{% endcontent-ref %}
***
## Further information
* FAQ: [What does "Already compatible" mean?](/knowledge-base/frequent-questions/what-does-already-compatible-mean)
* FAQ: [What does "Now avaiable" mean?](/knowledge-base/frequent-questions/what-does-now-avaiable-mean)
* FAQ: [What does "With new Shopware version" mean?](/knowledge-base/frequent-questions/what-does-with-new-shopware-version-mean)
* FAQ: [What does "Not compatible" mean?](/knowledge-base/frequent-questions/what-does-not-compatible-mean)
# Categories
In this section you will find useful instructions around the topic "**Categories**"
Before starting to edit your categories or category layouts we recommend you to take a look at our **video tutorial**. In the video"[Adapting the design of the category page](/knowledge-base/introduction/adapting-the-design-of-the-category-page)" we explain important basics which will help you a lot when creating and editing.
In addition, we recommend to have a look at the official **Shopware documentation**:
{% embed url="" %}
# Assign a category layout
In dieser Anleitung erfährst du, wie du ein Kategorie-Layout einer Kategorie zuweisen kannst.
## Layout zuweisen
1. Wechsel über die Hauptnavigation in die "**Kategorie-Verwaltung**" (1) (2) deines Shops ("Kataloge" => "Kategorien")
2. Wähle die entsprechende Kategorie aus (3)
3. Wechsel in den Tab "**Layout**" (4)
4. Klicke auf den Button "**Layout ändern**" (5)
5. Es erscheint ein Pop-up "**Layout auswählen**"
6. Wähle das gewünschte Layout aus (6)
7. Bestätige deine Auswahl mit "**Speichern**" (7)
8. Nun kannst du die Kategorie-Seite ebenfalls "**Speichern**" (8)
Du hast nun ein Kategorie-Layout einer Kategorie zugewiesen.
{% hint style="info" %}
**Hinweis**: Wie du eine Kategorie oder ein Kategorie-Layout erstellst erfährst du in den Artikeln [Create a category](/knowledge-base/tutorials/categories/create-a-category) bzw. [Create a category layout](/knowledge-base/tutorials/categories/create-a-category-layout).
{% endhint %}
#### Screenshots
Shopware 6 Kategorie-Verwaltung
Shopware 6 Kategorie-Editor
Layout auswählen
Fertig!
***
#### Weiterführende Informationen
Weitere Informationen zu Kategorien in Shopware 6 findest du in der Shopware Dokumentation:
{% embed url="" %}
Shopware Dokumentation: Kategorien
{% endembed %}
# Cooking pleasure & Provence (Demoshop)
You can find out how we created the "Cooking pleasure & Provence" category in our demo shops in the following step-by-step guide:
{% content-ref url="/pages/AlD7VvdFIG5LN3p1cwaS" %}
[Recreating category Shopping Experiences of the demoshops](/knowledge-base/tutorials/shopping-experiences/recreating-category-shopping-experiences-of-the-demoshops)
{% endcontent-ref %}
# Craft & Tradition (Demoshop)
You can find out how we created the "Craft & Tradition" category in our demo shops in the following step-by-step guide:
{% content-ref url="/pages/AlD7VvdFIG5LN3p1cwaS" %}
[Recreating category Shopping Experiences of the demoshops](/knowledge-base/tutorials/shopping-experiences/recreating-category-shopping-experiences-of-the-demoshops)
{% endcontent-ref %}
# Create a category
In dieser Anleitung erfährst du, wie du eine Kategorie-Seite anlegen kannst.
## Kategorie anlegen
1. Wechsel über die Hauptnavigation in die "**Kategorie-Verwaltung**" (1) (2) deines Shops ("Kataloge" => "Kategorien")
2. Wähle die gewünschte Kategorie aus in welcher die neue Kategorie erscheinen soll
3. Klicke auf den  **Kontext-Button** (3) um das Kontextmenü zu öffnen und eine neue Kategorie anzulegen
4. Wähle ob die neue Kategorie vor, nach oder als Subkategorie innerhalb der ausgewählten Kategorie erstellt werden soll (4)
5. Benne die Seite (5) und lege die Seite an (6)
6. Nun kannst du die Kategorie-Seite bearbeiten
7. Aktiviere die Seite damit Sie auch in der Storefront angezeigt wird (7)
Du hast nun eine Kategorie erstellt.
{% hint style="info" %}
**Hinweis**: Wie du ein Kategorie-Layout erstellst erfährst du im Artikel [Create a category layout](/knowledge-base/tutorials/categories/create-a-category-layout).
{% endhint %}
#### Screenshots
***
#### Weiterführende Informationen
Weitere Informationen zu Kategorien in Shopware 6 findest du in der Shopware Dokumentation:
{% embed url="" %}
Shopware Dokumentation: Kategorien
{% endembed %}
# Create a category layout
In dieser Anleitung erfährst du, wie du ein Kategorie-Layout erstellen kannst.
## Layout erstellen
1. Wechsel über die Hauptnavigation in die "**Erlebniswelt-Verwaltung**" (1) (2) deines Shops ("Inhalte" => "Erlebniswelten")
2. *Optional*: Du kannst die Layouts über den Reiter "**Kategorieseiten**" auf diesen Seitentyp eingrenzen (3)
3. Klicke auf den Button "**Neues Layout anlegen**" (4)
4. Wähle im folgenden Schritt den Typ "**Volle Breite**" aus (5)
* *Hinwies: Die Auswahl dient lediglich als Basis, du kannst später beliebig Sektionen hinzufügen und entfernen*
5. Zum Abschluss der Erstellung musst du deinem Layout einen Namen vergeben (6)
6. Erstelle das Layout nun mit dem Button "**Layout erstellen**" (7)
Du hast nun ein Erlebniswelt-Layout vom Typ "Kategorieseite" angelegt. Fülle dies nun mit deinem gewünschten Inhalt.
{% hint style="info" %}
**Hinweis**: Wie du ein Kategorie-Layout einer Kategorie zuweisen kannst erfährst du im Artikel [Assign a category layout](/knowledge-base/tutorials/categories/assign-a-category-layout).
{% endhint %}
#### Screenshots
   
***
#### Weiterführende Informationen
Weitere Informationen zu Kategorien in Shopware 6 findest du in der Shopware Dokumentation:
{% embed url="" %}
Shopware Dokumentation: Kategorien
{% endembed %}
# Create a category layout with sidebar
In dieser Anleitung erfährst du, wie du ein Kategorie-Layout mit Sidebar erstellen kannst.
## Layout erstellen
1. Wechsel über die Hauptnavigation in die "**Erlebniswelt-Verwaltung**" (1) (2) deines Shops ("Inhalte" => "Erlebniswelten")
2. *Optional*: Du kannst die Layouts über den Reiter "**Kategorieseiten**" auf diesen Seitentyp eingrenzen (3)
3. Klicke auf den Button "**Neues Layout anlegen**" (4)
4. Wähle im folgenden Schritt den Typ "**Sidebar**" aus (5)
* *Hinwies: Die Auswahl dient lediglich als Basis, du kannst später beliebig Sektionen hinzufügen und entfernen*
5. Zum Abschluss der Erstellung musst du deinem Layout einen Namen vergeben (6)
6. Erstelle das Layout nun mit dem Button "**Layout erstellen**" (7)
Du hast nun ein Erlebniswelt-Layout vom Typ "Kategorieseite" mit Sidebar angelegt. Fülle dies nun mit deinem gewünschten Inhalt.
{% hint style="info" %}
**Hinweis**: Wie du ein Kategorie-Layout einer Kategorie zuweisen kannst erfährst du im Artikel [Assign a category layout](/knowledge-base/tutorials/categories/assign-a-category-layout).
{% endhint %}
#### Screenshots
   
***
#### Weiterführende Informationen
Weitere Informationen zu Kategorien in Shopware 6 findest du in der Shopware Dokumentation:
{% embed url="" %}
Shopware Dokumentation: Kategorien
{% endembed %}
# Make product boxes more compact
In this tutorial you will learn how to make the product boxes more compact with ThemeWare®.
The "spacing" or "gaps" in product boxes – for example in product listings or product sliders – are intended by Shopware and already exist in the standard theme.
Technically, these are placeholders for information that are available depending on the product configuration and then should be displayed.
In order to avoid that each product box has a different height due to the lack of information in some products, these "placeholders" exist.
Information in these "placeholders" are for example the **rating stars** or the **variant characteristics**:
* **Rating stars** being displayed when a rating has been made for an item. Otherwise, the section in the listing will remain empty (white).
* **Variant characteristics** serve to differentiate "expanded" variants according to their property values. If an item is not an "expanded" variant, the section remains empty (white).
Since this information – depending on the product configuration – is quite useful, we have abstained from hiding this information. ThemeWare® gives you the possibility to do this yourself via the theme configuration.
## Make product boxes more compact
To make product boxes more compact, Shopware and ThemeWare® give you various options that we will present to you in this article:
* [Select compact layout in the Shopping Experience](#choose-layout-for-the-product-listing-or-product-slider)
* [Reduce elements of the product boxes](#configuring-product-boxes)
* [NEW: Select compact mode](#new-compact-mode-beta)
***
## Choose layout for the product listing or product slider
Shopware offers the option of changing the layout of the product listing or product slider via the Shopping Experience Editor.
For example, the layout types "Minimal content" and "Big image" do without the shortened product description.

#### Examples

***
## Configuring product boxes
With the following configuration fields you are able to show/hide content in the product box:
* **Product rating** (from ThemeWare® 0.2.3)
* Tab "Listing pages" => Block "Product box" => Section "Product rating" => Field "Show product rating"
* **Variant characteristics** (from ThemeWare® 0.3.0)
* Tab "Listing pages" => Block "Product box" => Section "Content" => Field "Show variant characteristics"
* **Order number**
* Tab "Listing pages" => Block "Product box" => Section "Content" => Field "Show product number"
* **Manufacturer** (from ThemeWare® 0.3.0)
* Tab "Listing pages" => Block "Product box" => Section "Content" => Field "Show manufacturer"
* **Price unit** (from ThemeWare® 0.3.0)
* Tab "Listing pages" => Block "Product box" => Section "Content" => Field "Show price unit"
* **Cheapest price** (from ThemeWare® 0.3.0)
* Tab "Listing pages" => Block "Product box" => Section "Content" => Field "Show cheapest price"
**Examples**

***
## New: Compact mode #beta
As a further option for more compact product boxes, we have integrated a "compact mode" into ThemeWare® with ThemeWare® 3.1.0. This is still in a test phase, but you are welcome to try it out and send us feedback via our service portal.
> Tab "Others" => Block "Beta" => Section "Product box" => Compact product boxes
***
## Conclusion
With the above features, you will be able to present the Shopware product listing in a much more compact way. With ThemeWare® you are free to decide which option you wish to hide in your shop.

# Make product listings more compact
How to make product boxes in product listing or sliders more compact is explained in the following article:
{% content-ref url="/pages/W2oyACTIGjwuJi2Sgc5P" %}
[Make product boxes more compact](/knowledge-base/tutorials/categories/make-product-boxes-more-compact)
{% endcontent-ref %}
# Mountain air & Adventure (Demoshop)
You can find out how we created the "Mountain air & Adventure" category in our demo shops in the following step-by-step guide:
{% content-ref url="/pages/AlD7VvdFIG5LN3p1cwaS" %}
[Recreating category Shopping Experiences of the demoshops](/knowledge-base/tutorials/shopping-experiences/recreating-category-shopping-experiences-of-the-demoshops)
{% endcontent-ref %}
# Setting up a category hero section
With ThemeWare® you give your category pages a large "Hero section" – an inviting header area with the category name, a background image and an optional breadcrumb. Give your categories a premium look, strengthen your brand and guide customers straight into your assortment.
{% hint style="info" %}
**Note**: You enable the "Hero section" centrally in the theme configuration. The name and image come from the category management; with custom fields you customise individual categories.
{% endhint %}
***
## Requirements
* a category you want to add a "Hero section" to
* optionally a background image (recommended image size: 1920 x 1080 pixels)
***
## Step 1: Enable the hero section in the theme
> "Theme Manager" => your ThemeWare® theme => "Extensions" tab => "Hero section (on listing pages)" block
Set **"Show 'Hero section' (CMS listing pages)"** to **"show"**. Using the further options in the same block, you can define text colour, text alignment, overlay, breadcrumb and more if needed. Save your changes.
{% hint style="info" %}
**Note**: If you choose **"show (via custom field)"**, the "Hero section" only appears in categories where you set the custom field to "yes". For CMS shop pages there is a separate field **"Show 'Hero section' (CMS shop pages)"**.
{% endhint %}
***
## Step 2: Maintain the category content
> "Catalogues" => "Categories" => select category => "General" tab
By default the "Hero section" shows content from the category:
* **Name** – in the "General" block (used as the heading)
* **Display image** – in the "Menu settings" block (used as the background image)
Save your changes.
***
## Step 3: Customise a category individually (optional)
> "Catalogues" => "Categories" => select category => "Custom fields"
Using the custom fields you overwrite the global theme configuration per category:
* **Show 'Hero section'** – switch the display on or off specifically
* **Hero section – Text** – your own text (empty = category description)
* **Hero section – Background image** – an alternative image instead of the display image
* **Hero section – Background color** and **Hero section – Text colour** – colours per category
Save the category.
***
## Result
The "Hero section" now appears at the top of the category page. If nothing shows up, clear the Shopware cache once.
{% hint style="success" %}
**ThemeWare® Tip**: Combine the global "show" setting with the custom field to suppress the "Hero section" in individual categories – this lets you design selected categories individually.
{% endhint %}
***
## Further information
You can find all configuration options and custom fields in detail in the ThemeWare® manual:
{% embed url="" %}
ThemeWare® Manual ⇒ Hero section
{% endembed %}
# Setting up a hover image in the listing
With ThemeWare® you show a second product image in the product listing as soon as your customers move the mouse over a product tile. This lets you reveal the back, a detail or the product in use – without opening the product page.
{% hint style="info" %}
**Note**: You maintain the hover image per product via a custom field and enable the effect in the theme configuration.
{% endhint %}
***
## Requirements
* a product you want to assign a second image to
* a suitable image for the hover effect in the Shopware media manager
***
## Step 1: Enable the hover effect in the theme
> "Theme Manager" => your ThemeWare® theme => "Listing pages" tab => "Product box" block => "Product image" section
Set the **"Hover effect"** configuration to **"crossfade images (Custom field)"** and save your changes.
***
## Step 2: Add the hover image to the product
> "Catalogues" => "Products" => select product => "Specifications" tab => "Custom fields" section => your theme's custom field set
In the **"Hover image"** custom field, select the desired image from the media manager and save the product.
***
## Result
When your customers hover over a product tile in the listing, the cover image gently crossfades into the hover image. If nothing shows up, clear the Shopware cache once.
{% hint style="success" %}
**ThemeWare® Tip**: Use the same aspect ratio for the cover and hover image so the transition stays calm. Extensions that modify the product image themselves can interfere with the "crossfade images" option – in that case, simply choose a different hover effect.
{% endhint %}
***
## Further information
You can find all details about the custom field in the ThemeWare® manual:
{% embed url="" %}
ThemeWare® Manual ⇒ Hover image
{% endembed %}
# Showing subcategories in the listing
With ThemeWare® you show a category's subcategories as tiles or links above the product listing. This guides your customers to the right range faster, improves internal linking and makes your category menu visible right on the page.
{% hint style="info" %}
**Note**: The feature only works on CMS pages of the type "Listing page". The **Name** and the **Display image** of the subcategories from the category management are shown – the image is optional.
{% endhint %}
***
## Requirements
* a category that has visible subcategories
* optionally a display image per subcategory
***
## Step 1: Enable subcategories in the theme
> "Theme Manager" => your ThemeWare® theme => "Extensions" tab => "Listing subcategories (on listing pages)" block
At **"Show 'Listing subcategories' (CMS listing pages)"** pick one of the options and save your changes:
* **show** – on all listing pages
* **show (via custom field)** – only in categories you enable via a custom field (see step 3)
* **don't show** – default, the feature stays off
***
## Step 2: Maintain the subcategories' names and images
> "Catalogues" => "Categories" => select category => "General" tab
In the "General" block you edit the **Name**, in the "Menu settings" block the **Display image** of the respective subcategory. This information appears in the tiles later on. Save the category.
***
## Step 3 (optional): Control the display per category via custom field
> "Catalogues" => "Categories" => select category => "Custom fields"
Use the custom field **"Show 'Listing subcategories'"** to control the display per category:
* **yes** – shows the subcategories in this category (required for the "show (via custom field)" option)
* **no** – hides them in this category (even with the global "show" option)
* **inherit from theme configuration** – follows the global setting from step 1
Save the category.
***
## Result
The subcategories now appear as tiles above the product listing. If nothing shows up, check that the category has visible subcategories and clear the Shopware cache once.
{% hint style="success" %}
**ThemeWare® Tip**: Add a meaningful display image for each subcategory – it makes the tiles far more appealing. You adjust the layout type, colours, typography and number of columns in the theme configuration in the same block.
{% endhint %}
***
## Further information
You can find all configuration options and the custom field in detail in the ThemeWare® manual:
{% embed url="" %}
ThemeWare® Manual ⇒ Listing subcategories
{% endembed %}
# Configuration
# Child theme
There are no child themes in Shopware 6 as there were in Shopware 5. Shopware 6 offers you the possibility to create a duplicate of the base theme. With this duplicate you can create a separate configuration, for example for an additional Sales Channel.
For more information on theme duplicates, click here: [ThemeWare® duplicates](/knowledge-base/tutorials/configuration/themeware-duplicates)
#### Template customizations
Template customizations are not possible with theme duplicates, because duplicates do not have their own file level. Template files must therefore be implemented in their own themes or with extensions.
For more information, click here: [Individual template customizations (Twig, HTML)](/knowledge-base/tutorials/individual-customizations/individual-template-customizations-twig-html)
# Color configuration field
A configuration field of the type "Color selection".
In the ThemeWare® configuration you will find various color configuration fields ([**Color selection**](https://knowledge.themeware.design/knowledge-base/tutorials/configuration/field-types-in-the-theme-configuration#color)). In tab "Layout", for example, you will find the block "Main colours".
You will find more on the topic of "color configuration" in the ThemeWare® introduction: [Configuring colours](/knowledge-base/introduction/configuring-colours) and in the basic knowledge article: [Color configuration](/knowledge-base/basic-knowledge/color-configuration).
# Field types in the theme configuration
In the configuration of the theme in the Theme Management you have different types of fields available. In the following we will provide you with an overview and explain the use of each field type and the values it can contain.
{% hint style="warning" %}
**Important**: Please make sure that all configuration fields are configured validly! Empty fields are usually not "allowed" (exception: Media Selection).
Incorrectly filled configuration fields can lead to representation errors or prevent the configuration from being saved!
{% endhint %}
{% hint style="success" %}
**Tip**: In the [ThemeWare® Config Finder](https://config.themeware.design/en) you will always find a suitable example value for each field, which you may use as a reference.
{% endhint %}
***
## Numeric field *(number)*
The number field can only contain numbers. The possible numbers may be limited by the field.
**Example values:** `10`, `0`, `-10`, etc.
{% hint style="info" %}
**Note**: The value "0" wasn't technically possible in Shopware 6 for a long time, which is why ThemeWare® often uses the value "1" instead. In this case, the "1" is automatically replaced by a "0".
{% endhint %}
***
## Color selection *(color)*
You can easily select a colour using the colour picker. Alternatively, you can also enter a [hexadecimal color code](https://en.wikipedia.org/wiki/Web_colors) directly.
**Example values:** `#000000`, `rgba(0, 0, 0, 0.9)`
#### Valid values
The value of a colour configuration is usually used as the **CSS property** `color` (or `background-color`). This property can have the following values:
* Colour names (`red`, `blue`, `black`, …)
* Hex values (`#ff0000`)
* RGB / RGBA (`rgb(255, 0, 0)`, `rgba(0, 0, 0, 0.5)`)
* Key words such as `transparent`, `currentColor`, `inherit`, `initial`, `unset`
{% hint style="info" %}
**Note**: The value "transparent" is also possible and is used for some elements to "hide" them instead of making them transparent.
{% endhint %}
#### Invalid values
* `none` is **not a** valid value for the CSS property `color` (text colour)
{% hint style="success" %}
**Tip**: If in doubt, always use a hex or RGBA value generated by the Shopware colour selector and check your entry with the "Validate" option in the "Save" button of the theme configuration.
{% endhint %}
***
## Media selection *(media)*
Use the Media Management (Media Manager) to upload an image (if not already available) and then select it.
**Example values:** "Medium selected" or "Medium reset".
{% hint style="info" %}
**Note**: Due to a Shopware bug, media fields could not be cleared for a while, so for example you will find a dropdown for media fields for background images to activate/deactivate the representation in the storefront.
{% endhint %}
***
## Select *(text + custom-options)*
In the select (drop-down selection) you can choose one of the available values.
**Example values:** -
***
## Text field *(text)*
An one-line text field, which theoretically allows any content. Here it depends on the context in which the content is used. Often distances or widths are specified here, which additionally require "px" or "%" appended. Sometimes HTML is deposited here as well.
**Example values:** Text, `..`, `10px`, `50%`, etc.
{% hint style="info" %}
**Note**: Always refer to the original content. Specifications such as "px" or "%" are not always necessary. For more information on valid values, please read the help text.
{% endhint %}
***
## Font *(fontFamily)*
A "Font" configuration field can contain a CSS [font-family](https://www.w3schools.com/cssref/pr_font_font-family.asp) property. The font entered here must be available to the visitor and either belong to the web-safe fonts (e.g. Times, Times New Roman, Georgia, Helvetica, Arial, Verdana) or be embedded as [@font-face](https://www.w3schools.com/cssref/css3_pr_font-face_rule.asp) in the storefront.
**Example values:** `'Inter', sans-serif`
{% hint style="info" %}
**Note**: Multiple fonts are not currently provided in this field. The content must always be a font including fallback font.
{% endhint %}
***
## Date & Time *(datetime)*
Here you are able to choose a date and a time
**Example values:** `2021-01-01 01:00`
# Font configuration field
A configuration field of the type "Font".
In the ThemeWare® configuration you will find two font configuration fields (text fields of the type [**Font**](https://knowledge.themeware.design/knowledge-base/tutorials/configuration/field-types-in-the-theme-configuration#fontfamily)) in tab "Layout" => block "Typography" - one in section "Text" and one in section "Headlines".
You will find more on the topic of "font configuration" in the ThemeWare® introduction: [Configuring fonts](/knowledge-base/introduction/configuring-fonts) and in the basic knowledge article: [Font configuration](/knowledge-base/basic-knowledge/font-configuration).
# Using SCSS functions in the configuration
In this tutorial, you will learn how to use SCSS functions in the theme configuration.
In the theme configuration you may also use simple **SCSS functions** in color fields in addition to theme variables. With such functions you can darken or lighten colors, for instance.
## Using SCSS functions
A **error-free syntax** is important to avoid errors in the storefront, therefore these functions are recommended for experienced users.

{% hint style="success" %}
**Tip**: In case you simply want to darken or lighten colors and do not want to use SCSS functions, you can use the online tool [Sass Color Generator](http://scg.ar-ch.org/) to generate light and dark color shades.
{% endhint %}
## Useful SCSS functions
In the following we will introduce a few useful SCSS functions. Please find more information in the official [SASS Documentation](https://sass-lang.com/documentation/modules/color).
To darken colors you may use the "**darken**" function:
```css
darken(#0c7ebb, 10%)
darken($sw-color-brand-primary, 10%)
```
To lighten colors, use the "**lighten**" function:
```css
lighten(#111, 10%)
lighten($sw-text-color, 10%)
```
In addition, there are other SCSS functions which can be used:
```css
complement($color) // RGB complementary color of $color
grayscale($color) // Gray value with same brightness as $color
darken($color, $amount) // Darkens the color $color (e.g. 10%)
lighten($color, $amount) // Lightens $color (e.g. 10%)
desaturate($color, $amount) // Reduces the saturation of $color (e.g. 10%).
saturate($color, $amount) // Increases the saturation of $color (e.g. 10%).
fade-in($color, $amount) // Makes $color more opaque (e.g. 0.1)
fade-out($color, $amount) // Makes $color more transparent (e.g. 0.1)
```
Several SCSS functions can also be combined in one color field. In the following example, the secondary color is lightened by 15% and the saturation is reduced by 5%:
```css
lighten(desaturate($sw-color-brand-secondary, 15%), 5%)
```
# Using theme variables in the configuration
In this tutorial you will learn how to use theme variables in the theme configuration.
In the theme configuration you will occasionally find variables in color fields. This unifies the color image of your Storefront and makes it easier to customize the color image to your preferences.
There are two relevant notations for variables:
1. **Shopware variables:**
* $**sw**-color-brand-primary = Primary color in the Storefront
* $**sw**-color-brand-secondary = Secondary color in the Storefront
* $**sw**-text-color = Text color in the Storefront
* $**sw**-background-color = Background color in the Storefront
* usw.
2. **ThemeWare® Variables:**
* $**twt**-color-brand-primary-light = A light shade of the primary color
* $**twt**-color-brand-primary-dark = A darker shade of the primary color
* $**twt**-color-brand-secondary-light = A lighter shade of the secondary color
* $**twt**-color-brand-secondary-dark = A darker shade of the secondary color
* and so on.
## Preface
Currently, the use of variables in Themes should be handled with care! In Shopware 6, variables must be initialized in a configuration field before being used. Therefore, a variable cannot be used in a configuration field ahead of the theme variable's actual configuration field.
This especially affects theme duplicates, as they – for whatever reason – currently do not get the order for configuration fields as intended by the developer.
## Finding variables
The variable for each configuration field can be found quickly using our [ThemeWare® Config Finder](https://config.themeware.design/en). Just enter the name of a field and if necessary the block you want to search in (e.g. "[typography headline textcolor](https://config.themeware.design/en?searchtext=typography%20headline%20color)") and you will find the matching configuration field(s).
The variables are listed as "Technical name" for each field.
When compiling the Theme, the variables are replaced by the value stored in the corresponding configuration field.
## Using variables
Variables can be used in different configuration fields.
**Limitation**: In Shopware standard configuration fields, theme variables ($twt...) cannot be used due to theme inheritance.
In case configuration fields are not suitable in principle, you will find a corresponding hint in the help text.

> **Tip**: The best is to save and compile the theme once after each used theme variable in order to check whether the variable is possible in the corresponding configuration field.
>
> In case this is not possible, you will receive the following error.
## Error "Undefined Variable"
This error occurs when Shopware is not "aware" of a variable. This would occur when working with theme variables when (as described above) the variable has not already been initialized before use.
In this case please change the variable back to a HEX or RGB/RGBA value.
# ThemeWare® duplicates
All about ThemeWare® theme duplicates (child themes) in Shopware 6
In this article you will learn everything about ThemeWare® theme duplicates in Shopware 6.
{% hint style="info" %}
**Note**: Shopware is currently working on improvements of theme configuration, theme inheritance and duplicates.
We will update this article as soon as changes are available.
{% endhint %}
## What is a ThemeWare® duplicate?
Basically, a theme duplicate is nothing more than another entry in the Shopware 6 Database. This allows you to save an alternative or separate theme configuration (e.g. for additional sales channels).
The theme duplicate inherits when created the current configuration of the base theme or parent theme (often as well called "mother theme"). This is similar to the handling of Variant Articles. More about the configuration you will learn below in this article.
#### Parent theme vs base theme
In principle, parent theme and base theme mean the same Theme. base theme virtually means the "original" theme you have purchased or rented. In the following, we use the term parent theme to make clear that there is also a theme duplicate of the base theme.
base theme or parent theme + theme duplicate
{% hint style="info" %}
**Note**: How to reset the theme configuration, please read our article [Resetting ThemeWare®](/knowledge-base/tutorials/administration/resetting-themeware).
{% endhint %}
## Difference to the Shopware 5 theme derivation
Theme derivations in Shopware 5 have, in addition to the entry in the Database for the configuration, also created folders and files on the server, through which then individual customizations could be realized or additional files (e.g. fonts) could be included.
A theme duplicate in Shopware 6 does not (currently) provide you with a folder and files for customization.
{% hint style="info" %}
**Note**: How you can still implement template customizations, please find in our article [Individual template customizations (Twig, HTML)](/knowledge-base/tutorials/individual-customizations/individual-template-customizations-twig-html).
{% endhint %}
## Restrictions on theme duplicates
As explained above, individual customizations (e.g. via templates) cannot be realized with duplicates.
> **Sorting configuration fields**
>
> Another limitation is a Shopware bug that affects the sorting of configuration fields in theme duplicates:
>
> Caused by this bug, theme duplicates ignore the vendor-defined order for configuration fields and unfortunately represent them in a "random" order.
>
> Unfortunately, this affects all themes.
>
> **Note**: In Shopware 6.4.8.0 this bug was fixed by Shopware.
> **New configuration fields of the base theme are missing in the duplicate**.
>
> In addition, there is another Shopware bug in Shopware 6 that causes new configuration fields to not be automatically transferred to duplicates when updating from the Parent Theme.
>
> Unfortunately, this affects all themes.
>
> **Tip**: How to transfer missing configuration fields to your duplicate, you can read in our article. [New configuration fields are missing in a theme duplicate after update](/knowledge-base/common-issues/administration/new-configuration-fields-are-missing-in-a-theme-duplicate-after-update).
>
> **Note**: In Shopware 6.4.8.0 this bug was fixed by Shopware.
## Modifications in Shopware 6.4.8.0
Since Shopware 6.4.8.0 the theme duplicates work much better than before. The issues we reported to Shopware have finally been fixed by Shopware and therefore, there are currently no further restrictions when using theme duplicates.
* New configuration fields are now included in theme duplicates when updating the Parent Theme.
* The sorting of the configuration fields now corresponds with the sorting of the Parent Theme.
## base theme vs. theme duplicate
Of course you may just go ahead and configure the base theme. At any time you are able to create a duplicate and reset the configuration from the base theme when necessary.
## When to create a theme duplicate?
In case you need a separate configuration (e.g. for another sales channel), you should solve this via a theme duplicate. There is no need to purchase/rent another theme for it.
{% hint style="success" %}
**Tip**: A theme duplicate can be created at any time later.
{% endhint %}
## Recognizing a ThemeWare® duplicate
Parent Themes cannot be deleted via the Theme Management and therefore have a small lock icon next to their name.
theme duplicates, on the other hand, can be deleted via the Theme Management and therefore do not have this icon:

This is as well visible in the context menu via the Context Button of each Theme. Moreover, from duplicates, you cannot create more duplicates and delete base themes from Theme Management:

In addition, there is a note in the theme configuration that this theme is a duplicate of theme XY:

## Creating a theme duplicate
How to create a ThemeWare® theme duplicate, you will find in the article:
{% content-ref url="/pages/0yD6JYWRwQl8XAMiCe5C" %}
[Creating a ThemeWare® duplicate](/knowledge-base/tutorials/configuration/creating-a-themeware-duplicate)
{% endcontent-ref %}
## Rename theme duplicate
How to rename a ThemeWare® theme duplicate, please read in the article:
{% content-ref url="/pages/3XmmCJ9FLCQBXlAirV6E" %}
[Renaming a ThemeWare® duplicate](/knowledge-base/tutorials/configuration/renaming-a-themeware-duplicate)
{% endcontent-ref %}
## Configuration of a theme duplicate
Configuration fields in a theme duplicate are grayed out. This means that this configuration field is derived from the base theme and therefore equals the configuration field from it.
You probably know the handling of inherited configuration fields from variant articles.

### Remove inheritance
In case you wish to configure a configuration field differently, just click onto the "Anchor" Icon "**Remove inheritance**".

### Restore inheritance
In case you wish to restore the value of a configuration field from the base theme, click onto the "Anchor" icon. "**Restore inheritance**".

## Errors and problems
Up to Shopware 6.4.8.0 there are a few restrictions in theme duplicates due to Shopware Bugs. These have at last been fixed with Shopware 6.4.8.0.
Please find out more in the section \[#restrictions-on-theme-duplicates].(themeware-duplikate.md#einschraenkungen-bei-theme-duplikaten "mention").
# Creating a ThemeWare® duplicate
In this tutorial you will learn how to create a ThemeWare® theme duplicate in Shopware 6.
1. Open the administration of your shop
2. Change via the main navigation to the "**Theme Management**" ("Content" => "Themes")
* **Note**: In the Shopware Cloud, please find the section "Themes" directly in the main navigation.
3. Now click onto the  **Context button** in the upper right of the preview image of your ThemeWare® base theme in order to open the Context Menu.\

4. Click "**Create duplicate**"
5. A pop-up will appear again allowing you to enter the name for the duplicate
6. Confirm the creation with "**Create duplicate**".
Now you have created a ThemeWare® theme duplicate and you are free to configure it independently from the Parent Theme.
{% hint style="success" %}
**Tip:** You will benefit from our improved theme configuration representation when the name of the duplicate contains the word "ThemeWare".
{% endhint %}
# Renaming a ThemeWare® duplicate
In this tutorial you will learn how to rename a ThemeWare® theme duplicate in Shopware 6.
1. Open the administration of your shop
2. Switch via the main navigation to the "**Theme Management**" ("Content" => "Themes")
* **Note**: In the Shopware Cloud, you will find the section "Themes" directly in the main navigation.
3. In order to open the context menu, click onto the **Context button**  in the top right-hand corner of the ThemeWare® duplicate preview image.\

4. Click "**Rename**"
5. A pop-up will appear again in which you can change the name of the duplicate
6. Confirm the change with "**Save**".
{% hint style="success" %}
**Tip:** You will benefit from our improved theme configuration representation when the name of the duplicate contains the word "ThemeWare".
{% endhint %}
# Orphaned configuration fields
With ThemeWare® you benefit from continuous further development. Therefore, from time to time we might remove or replace configuration fields.
Unfortunately, the Shopware update routine does not automatically remove deleted configuration fields.
On our hint (NEXT-14571) Shopware has extended the "Save" button in the theme configuration in Shopware 6.4.8.0 and added a "Clean" function. With this you are able to delete "Orphaned configuration fields".
> "The current values are completely re-saved. To be used when fields have been deleted or have changed their type."
"**Orphaned configuration fields**" occur when a configuration field has been edited and this configuration field is deleted with a theme update.
In this case, your configuration will remain in the database and this configuration will end up as a configuration field in the tab "General".
Typically, this field then has the technical name and not the original label as its name.
{% hint style="info" %}
**Note**: How to remove "Orphaned configuration fields" can be found in the tutorial [Cleaning up ThemeWare®](/knowledge-base/tutorials/administration/cleaning-up-themeware).
{% endhint %}
#### Screenshots

# Custom Fields
Custom fields are a core feature of Shopware 6 and let you extend products, categories or manufacturers individually. With custom fields you flexibly store additional information and output it in the storefront when needed.
The following step-by-step guide shows how to create a custom field, using a GPSR "safety notice" as an example.
***
## Creating a custom field set
{% hint style="warning" %}
**Important:** Create a separate custom field set for **your individual custom fields** and **do not use the ThemeWare® sets** or existing sets from other themes and extensions.
{% endhint %}
{% hint style="info" %}
**Note**: You don’t need to create a separate set for every single additional field, but as the number of additional fields increases, sets help you to keep track of them all.
{% endhint %}
#### 1) Create a new custom field set
Go to the custom field management:
> "Settings" => "System" => "Custom fields" => "Create set"
Click "Create set" and create a new custom field set.
* Technical name: e.g. `custom_gpsr`
* Label: e.g. `GPSR (products)`
* Use for: Products
***
## Creating a custom field
{% hint style="warning" %}
**Important:** Create a separate custom field set for **your individual custom fields** and **do not use the ThemeWare® sets** or existing sets from other themes and extensions.
{% endhint %}
#### 1) Create a new custom field
Click "New custom field" and create a new custom field.
* Type: e.g. `Text editor`
* Technical name: e.g. `custom_gpsr_safety_notice`
* Label: e.g. `Safety notice`
#### 2) Fill in the custom field
Go to the product management and edit the desired product. Fill in the new custom field (e.g. "Safety notice"):
> "Catalogues" => "Products" => "Specifications" tab => "Custom fields" section => "GPSR (products)" tab => "Safety notice" field
{% hint style="success" %}
**Tip**: Since we created a custom field of type "Text editor", you can also apply HTML formatting.
{% endhint %}
***
## Outputting a custom field in the storefront
Since neither Shopware nor ThemeWare® can know where your individual custom field should appear, you embed it **manually** – either via a **CMS element** in a Shopping Experiences layout (simple, from Shopware 6.6.9) or via an individual **template customization** (more flexible, incl. empty check):
{% content-ref url="/pages/aOfCAXK71CzYRxgiN0XD" %}
[Show custom fields in the storefront](/knowledge-base/tutorials/individual-customizations/show-custom-fields-in-the-storefront)
{% endcontent-ref %}
{% content-ref url="/pages/xbaIUEySke6yXrVzbntc" %}
[Show custom fields in Shopping Experiences](/knowledge-base/tutorials/shopping-experiences/show-custom-fields-in-shopping-experiences)
{% endcontent-ref %}
***
## Ready-made ThemeWare® features using custom fields
Many ThemeWare® features already use **prepared custom fields** – so you don't create anything yourself, you just fill in the fields and enable the feature in the theme configuration. The matching step-by-step guides:
**Product pages**
* [Embedding product videos (YouTube & Vimeo)](/knowledge-base/tutorials/product-pages/embedding-product-videos)
* [Providing datasheets as PDF](/knowledge-base/tutorials/product-pages/providing-datasheets)
* [Providing downloads on products](/knowledge-base/tutorials/product-pages/providing-downloads)
* [Showing care symbols & product symbols](/knowledge-base/tutorials/product-pages/care-symbols-product-symbols)
* [Showing GPSR information on product pages](/knowledge-base/tutorials/product-pages/gpsr-information-product-pages)
* [Creating a custom tab on the product page](/knowledge-base/tutorials/product-pages/custom-product-tab)
**Categories & navigation**
* [Setting up a hover image in the listing](/knowledge-base/tutorials/categories/hover-image-in-listing)
* [Setting up a category hero section](/knowledge-base/tutorials/categories/category-hero-section)
* [Showing subcategories in the listing](/knowledge-base/tutorials/categories/subcategories-in-listing)
* [Setting up the Mega Menu](/knowledge-base/tutorials/header/mega-menu-flyout)
* [Highlighting a category in the navigation](/knowledge-base/tutorials/header/highlight-category-in-navigation)
***
## Further information
You can find more information about ThemeWare® custom fields in the ThemeWare® manual:
{% embed url="" %}
ThemeWare® Manual ⇒ Custom fields
{% endembed %}
# Debugging
# Identifying the extension as the cause of the error
Before reporting an issue, you can easily check yourself whether a specific extension (plugin or app) causes the problem.
## Deactivating extensions
Deactivate (not uninstall!) all used extension (plugins or apps). If the problem does no more exist after deactivating all extensions, the problem is probably due to an extension.
{% hint style="warning" %}
**Important:** Settings of an extension are preserved when the extension is deactivated. *(Status: Shopware 6.4.11.0)*
{% endhint %}
{% hint style="info" %}
**Note**: The article is part of our guided troubleshooting assistant and explains a specific step in this process.
In order to perform the corresponding steps in the correct order, please use the troubleshooting assistant.
{% endhint %}
***
#### Further information:
{% content-ref url="/pages/VztO0qu6lkfegXAOqrRm" %}
[Examining extensions or plugins](/knowledge-base/tutorials/solving-errors/examining-extensions-or-plugins)
{% endcontent-ref %}
# Debugging error messages
Debugging error messages in the Shopware 6 administration
When Shopware is running in production mode, usually only general messages like "Theme could not be assigned to sales channel." are being displayed. Based on these general messages, it unfortunately is not possible to identify the cause of the error more precisely.
The first step in case of error messages in the administration is to receive a more detailed error message.
## Receiving more detailed error message
To receive a more detailed error message use one or both of the following options:
* Check your **PHP error log** for further information.
* In case you don't know how to change the value, your hoster will certainly be happy to help you.
* Put Shopware (temporarily) into the **debug mode**.
* Please find a guidance in the [Shopware Documentation](https://docs.shopware.com/en/en/shopware-6-en/tutorials-and-faq/debugging).
{% hint style="info" %}
**Note**: The article is part of our guided troubleshooting assistant and explains a specific step in this process.
In order to perform the corresponding steps in the correct order, please use the troubleshooting assistant.
{% endhint %}
# Narrowing down errors
Before reporting an issue, you can easily check yourself whether a customization, a specific extension (plugin or app) or the theme is responsible for the problem.
## Check whether the problem is caused by the theme
To check whether the error or problem is actually caused by the theme, please have a look at the following article:
{% content-ref url="/pages/S1gf9PtVGHLWPtbg2IGn" %}
[Examining Shopware default theme](/knowledge-base/tutorials/solving-errors/examining-shopware-default-theme)
{% endcontent-ref %}
## Check whether a customization causes the error
To check whether the error or problem is caused by a customization, please have a look at the following article:
{% content-ref url="/pages/I3BNscFTbpV78laRF1au" %}
[Examining individual customizations](/knowledge-base/tutorials/solving-errors/examining-individual-customizations)
{% endcontent-ref %}
## Check whether an extension is causing the error
To check whether the error or problem is caused by a specific extension (plugin or app), please have a look at the following article:
{% content-ref url="/pages/VztO0qu6lkfegXAOqrRm" %}
[Examining extensions or plugins](/knowledge-base/tutorials/solving-errors/examining-extensions-or-plugins)
{% endcontent-ref %}
{% hint style="info" %}
**Note**: The article is part of our guided troubleshooting assistant and explains a specific step in this process.
To make sure to follow the steps in the right order, please use the troubleshooting assistant.
{% endhint %}
# Identifying the theme as the cause of error
Before reporting an issue, you can easily check yourself whether your theme might be responsible for the problem.
### Assigning Shopware Standard Theme
Assign the "**Shopware default theme**" once to your storefront . Does the problem also exists in the default theme, it is 99.9% likely that ThemeWare® is not responsible for the trouble.
{% hint style="info" %}
**Note**: The article is part of our guided troubleshooting assistant and explains a specific step in this process.
In order to perform the corresponding steps in the correct order, please use the troubleshooting assistant.
{% endhint %}
***
#### Further information:
{% content-ref url="/pages/S1gf9PtVGHLWPtbg2IGn" %}
[Examining Shopware default theme](/knowledge-base/tutorials/solving-errors/examining-shopware-default-theme)
{% endcontent-ref %}
# Validate the theme configuration
In this article, you will learn how to validate your theme configuration.
Before reporting an issue, you can easily check whether your individual configuration has an error.
**Just use the "Validate" feature in Shopware.**
This is useful if you receive an error message such as `Invalid configuration – The configuration is faulty. The theme cannot be saved.` or the theme could not be saved.
To validate your configuration, open the theme configuration and click on the arrow next to the Save button. There you will find the "Validate" option.
The validation should give you an indication of which value is incorrect.
{% hint style="info" %}
**Note**: In the cases known to date, the error was always due to an incorrectly filled colour configuration.
{% endhint %}
{% hint style="success" %}
**Tip**: Use Shopware's colour picker to obtain a valid colour value.
{% endhint %}
Learn how to find/fix invalid fields in the following instructions:
{% content-ref url="/pages/nsG3fZY3asaeY3N59hUI" %}
[Fixing invalid configuration fields](/knowledge-base/tutorials/solving-errors/fixing-invalid-configuration-fields)
{% endcontent-ref %}
# Debug mode
In the ThemeWare® plugin configuration (not theme configuration) you have the option to enable the **ThemeWare® "Debug mode"**.
ThemeWare® "Debug mode"
If "Debug mode" is enabled, the "Expert settings", for example, are no longer taken into account.
{% hint style="info" %}
**Note**: The "Debug mode" should not be used in productive environments.
{% endhint %}
#### Debugging
If you have issues in your shop, activate "Debug mode" once, clear the Shopware cache and your browser cache and then check the Storefront again.
This allows you to check whether there are any problems with your "Expert Settings" with just one click.
Deactivate "Debug mode" when you have finished debugging.
{% hint style="info" %}
**Note**: The "Expert settings" are "individual customisations". As part of the plugin support, we cannot provide support here, or only to a very limited extent.
{% endhint %}
# Demoshops
# Home page
Wie du die Startseite deines Themes erstellen kannst, erfährst du in folgendem Artikel:
{% content-ref url="/pages/mhIypX3D5GsBxlHzBL4p" %}
[Setting up the home page (ThemeWare® Shopping Experience)](/knowledge-base/introduction/startseite-themeware-erlebniswelt-einrichten)
{% endcontent-ref %}
# Category "Mountain air & Adventure"
You can find out how we created the "Mountain air & Adventure" category in our demo shops in the following step-by-step guide:
{% content-ref url="/pages/AlD7VvdFIG5LN3p1cwaS" %}
[Recreating category Shopping Experiences of the demoshops](/knowledge-base/tutorials/shopping-experiences/recreating-category-shopping-experiences-of-the-demoshops)
{% endcontent-ref %}
# Category "Cooking pleasure & Provence"
You can find out how we created the "Cooking pleasure & Provence" category in our demo shops in the following step-by-step guide:
{% content-ref url="/pages/AlD7VvdFIG5LN3p1cwaS" %}
[Recreating category Shopping Experiences of the demoshops](/knowledge-base/tutorials/shopping-experiences/recreating-category-shopping-experiences-of-the-demoshops)
{% endcontent-ref %}
# Category "Craft & Tradition"
You can find out how we created the "Craft & Tradition" category in our demo shops in the following step-by-step guide:
{% content-ref url="/pages/AlD7VvdFIG5LN3p1cwaS" %}
[Recreating category Shopping Experiences of the demoshops](/knowledge-base/tutorials/shopping-experiences/recreating-category-shopping-experiences-of-the-demoshops)
{% endcontent-ref %}
# Configuration
The ThemeWare® demoshops present all ThemeWare® themes live and in action. You may notice that some of the demos differ from your freshly installed theme. In this article you will find out what the differences are and why certain deviations are normal – as new features are not automatically activated in existing customer shops, but should be presented in our demos.
***
#### Are there any differences in the configuration between my theme and the demo shops?
Yes, these mainly relate to the ThemeWare® configuration. However, you can easily transfer them to your ThemeWare® theme.
#### Why are there differences in the configuration between my theme and the demoshops?
With ThemeWare® you benefit from extremely regular updates with new features and configuration options. To ensure that new features have no undesirable impact on existing ThemeWare® customer shops, they are deactivated by default when they are released.
Our demoshops are based entirely on ThemeWare® and are designed to show you the latest features. This is why they deviate slightly from the standard configuration over time. Don't worry: everything we show in the demo shops can also be activated in your own theme with just a few clicks. This gives you full control and you can decide for yourself which new features you want to use and which not.
#### Are there any other differences between my theme and the demo shops?
**Damo data**: ThemeWare® does not install products, categories or Shopping Experiences in your shop so that existing data is not affected. However, you can easily import demo data with the free demo data plugins from Shopware or ThemeWare® if required.
**Pro and Cloud Edition**: Please note that there are technical differences between the Pro Edition and the Cloud Edition. These relate exclusively to the "CMS elements" (= Shopping Experiences). Our demoshops are based on the Pro Edition and therefore show the full functionality of ThemeWare® Edition. You can find more information [here](https://service.themeware.design/en/articles/themeware-editions-compared).
#### Which configurations were changed in the demoshops?
Below we show you which configurations we have made in the demos and where you can find them.
***
{% hint style="info" %}
**Note**: The translation is still in progress. We apologise for the delay.
{% endhint %}
## Header
Im Header haben wir die Schriftgröße im Flyout der Top-Navigation etwas reduziert.
### Top-Navigation Flyout
* Tab "Header"
* Bereich "Top-Navigation Flyout"
* Abschnitt "Level 2"
* **Schriftgröße**: 15
* Abschnitt "Level 3 ..."
* **Schriftgröße**: 15
***
## Inhalt
In unseren Demoshops blenden wir die Standard-Breadcrumb aus und nutzen bei Bedarf die ThemeWare® CMS-Breadcrumb der Pro-Edition oder die Breadcrumb der ThemeWare® Hero-Sektion.
Darüber hinaus haben wir die Lagerbestand-Badge etwas umkonfiguriert.
### Breadcrumb
* Tab "Inhalt"
* Bereich "Breadcrumb"
* **Breadcrumb anzeigen (Startseite)**: nicht anzeigen
* **Breadcrumb anzeigen (CMS-Shopseiten)**: nicht anzeigen
* **Breadcrumb anzeigen (CMS-Landingpages)**: nicht anzeigen
* **Breadcrumb anzeigen (CMS-Kategorieseiten)**: nicht anzeigen
* **Breadcrumb anzeigen (CMS-Produktseite)**: nicht anzeigen
### Produkt-Badges
* Tab "Inhalt"
* Bereich "Produkt-Badges"
* Abschnitt "Badge: Lagerbestand-Badge"
* **Schwellwert (hoher Bestand)**: 1000
* Abschnitt "Badge: Rabatt-Badge"
* **Layout**: -25 %
***
## Erlebniswelten
Im Bereich "Erlebniswelten" nutzen wir die ThemeWare® CSS-Scroll-Animationen und blenden die Filter-Überschrift in der Sidebar ein.
### Alle Typen (Shopseiten, Landingpages, Kategorieseiten, Produktseiten)
* Tab "Erlebniswelten"
* Bereich "Alle Typen (Shopseiten, Landingpages, Kategorieseiten, Produktseiten)"
* Abschnitt "CSS-Scroll-Animationen"
* **CSS-Scroll-Animation (CMS-Blöcke)**: fade in
* **CSS-Scroll-Animation (Überschriften in CMS-Blöcken)**: keine
### Produkt-Filter (Kategorie "Sidebar")
* Tab "Erlebniswelten"
* Bereich "Produkt-Filter (Kategorie "Sidebar")"
* Abschnitt "Headline (in der Sidebar)"
* **Filter-Überschrift anzeigen**: anzeigen
***
## Kategorieseiten
Auf Kategorieseiten haben wir die Produkt-Boxen um konfiguriert und nutzen das "Hover-Bild"-Feature von ThemeWare®.
### Produkt-Box
* Tab "Kategorieseiten"
* Bereich "Produkt-Box"
* Abschnitt "Inhalte"
* **Variantenmerkmale anzeigen**: nicht anzeigen
* **Produktnummer anzeigen**: je Layout-Typ
* **Hersteller anzeigen**: je Layout-Typ
* **Preiseinheit anzeigen**: nicht anzeigen
* **Kurzbeschreibung verwenden**: verwenden
* Abschnitt "Basiskonfiguration"
* **Hover-Effekt (Kaufen-Button / Details-Button)**: slide up
* Abschnitt "Produktbild"
* **Hover-Effekt**: Bilder überblenden (Zusatzfeld)
* Abschnitt "Produkt-Bewertung"
* **Produkt-Bewertung anzeigen**: Produkt-Bewertung immer anzeigen
* Abschnitt "Layout- und Responsive-Verbesserungen"
* **Kompakte Produkt-Boxen**: ja
### Produkt-Box (Layout-Typ "Standard")
* Tab "Kategorieseiten"
* Bereich "Produkt-Box (Layout-Typ "Standard")"
* Abschnitt "Inhalte"
* **Produktnummer anzeigen**: anzeigen
* **Hersteller anzeigen**: anzeigen
***
## Produktseiten
Auf Produktseiten haben wir die vielen neuen und verkaufsfördernden Funktionen von ThemeWare® aktiviert.
* Tab "Produktseiten"
* Bereich "Layout"
* Abschnitt "Basiskonfiguration"
* **Sticky "Galerie und Buybox"**: ja
### Galerie
* Tab "Produktseiten"
* Bereich "Galerie"
* Abschnitt "Basiskonfiguration"
* **Hinweistext "Abbildung ähnlich" anzeigen**: anzeigen
### Buybox
* Tab "Produktseiten"
* Bereich "Buybox"
* Abschnitt "Basiskonfiguration"
* **Kurzbeschreibung anzeigen**: anzeigen
### Produkt-Badges (in der Galerie oder Buybox)
* Tab "Produktseiten"
* Bereich "Produkt-Badges (in der Galerie oder Buybox)"
* **Produkt-Badges anzeigen**: anzeigen
### Lieferinformationen-Label
* Tab "Produktseiten"
* Bereich "Lieferinformationen-Labels (in der Buybox)"
* Abschnitt "Label: Lagerbestand-Label"
* **Lagerbestand-Label anzeigen**: anzeigen
### Produkt-Spezifikationen (in der Buybox)
* Tab "Produktseiten"
* Bereich "Produkt-Spezifikationen (in der Buybox)"
* Abschnitt "Abschnitt: Allgemeine Informationen"
* **Hersteller anzeigen**: anzeigen
* Abschnitt "Abschnitt: Auszeichnung"
* **Hersteller-Produktnummer anzeigen**: anzeigen
* **GTIN/EAN anzeigen**: anzeigen
* Abschnitt "Abschnitt: Maße"
* **Gewicht anzeigen**: anzeigen
* **Länge anzeigen**: anzeigen
* **Breite anzeigen**: anzeigen
* **Höhe anzeigen**: anzeigen
* Abschnitt "Abschnitt: Lieferbarkeit"
* **Verfügbaren Bestand anzeigen**: anzeigen
* **Minimale Bestellmenge anzeigen**: anzeigen
* **Maximale Bestellmenge anzeigen**: anzeigen
* **Zusatzfeld 3 anzeigen**: anzeigen
### Vorteile (in der Buybox)
* Tab "Produktseiten"
* Bereich "Vorteile (in der Buybox)"
* **Vorteile anzeigen**: anzeigen
* Abschnitt "Basiskonfiguration"
* **Inhalt**: Zusatzfeld oder Textbaustein
### Teilen-Links (in der Buybox)
* Tab "Produktseiten"
* Bereich "Teilen-Links (in der Buybox)"
* **Teilen-Links anzeigen**: anzeigen
* Abschnitt "Links"
* **Facebook-Link anzeigen**: anzeigen
* **X-Link anzeigen**: anzeigen
* **Pinterest-Link anzeigen**: anzeigen
* **WhatsApp-Link anzeigen**: anzeigen
### Tab "Beschreibung"
* Tab "Produktseiten"
* Bereich "Tab "Beschreibung""
* Abschnitt "Weiterführende Produkt-Links"
* **Weiterführende Links anzeigen**: anzeigen
* Abschnitt "Downloads"
* **Downloads anzeigen**: anzeigen
* Abschnitt "Kommentar"
* **Kommentar anzeigen**: anzeigen
### Eigenschaften-Tabelle (in Tabs)
* Tab "Produktseiten"
* Bereich "Eigenschaften-Tabelle (in Tabs)"
* Abschnitt "Basiskonfiguration"
* **Hinweistext unter der Eigenschaften-Tabelle anzeigen**: anzeigen
* **Zwischenüberschrift anzeigen**: anzeigen
### Produktvideos (in Tabs)
* Tab "Produktseiten"
* Bereich "Produktvideos (in Tabs)"
* **Produktvideos anzeigen**: in separaten Tab anzeigen
### Datenblätter (in Tabs)
* Tab "Produktseiten"
* Bereich "Datenblätter (in Tabs)"
* **Datenblätter anzeigen**: in separaten Tab anzeigen
### Tab "Benutzerdefinierter Inhalt"
* Tab "Produktseiten"
* Bereich "Tab "Benutzerdefinierter Inhalt""
* **Benutzerdefinierten Tab anzeigen**: anzeigen
### Hersteller (in Tabs)
* Tab "Produktseiten"
* Bereich "Hersteller (in Tabs)"
* **Hersteller anzeigen**: in separaten Tab anzeigen
***
## Sidebar
In der "Sidebar" haben wir zwei Elemente aktiviert:
* Tab "Sidebar"
* Bereich "Sidebar-Widgets: Inhalte zuweisen und anordnen"
* Abschnitt "Element 2"
* **Inhalt (Widget)**: Vorteile
* Abschnitt "Element 3"
* **Inhalt (Widget)**: Communities bzw. Social Media
***
## Widgets
Im Bereich "Widgets" nutzen wir das Standard SSL-Siegel. Zudem blenden wir das alte Twitter Logo aus und das neue X-Logo ein.
### SSL-Siegel
* Tab "Widgets"
* Bereich "Auszeichnungen, Siegel oder Zertifikate"
* Abschnitt "Basiskonfiguration"
* **Standard SSL-Siegel anzeigen**: anzeigen
* Bereich "Communities bzw. Social Media"
* Abschnitt "Social Icons"
* **Twitter-Link anzeigen**: nein
* **X-Link anzeigen**: ja
***
## Erweiterungen
In den Demoshops haben wir die neue "Hero-Sektion" aktiviert und die breite der USP-Bar angepasst.
### Hero-Sektion
* Tab "Erweiterungen"
* Bereich "Hero-Sektion (auf Kategorieseiten)"
* **Hero-Sektion anzeigen (CMS-Listingseiten)**: anzeigen (per Zusatzfeld)
* Abschnitt "Breadcrumb"
* **Breadcrumb anzeigen**: ja
* **Inhalt ausrichten**: rechts ausrichten
* Abschnitt "Basiskonfiguration"
* **Nächstes Element hochziehen**: ja (über Zusatzfeld)
### USP-Bar
* Tab "Erweiterungen"
* Bereich "USP-Bar"
* Abschnitt "Basiskonfiguration"
* **Größenmodus (Header)**: 100% (Full-width)
***
## Weiteres
Im Tab "Weiteres" nutzen wir zusätzliche CSS-Klassen von ThemeWare® für die Individualisierung der Erlebniswelten.
* Tab "Weiteres"
* Bereich "Erweiterte Einstellungen"
* Abschnitt "Zusätzliche CSS-Klassen"
* **Erweiterte CSS-Abstandsklassen laden (optional)**: ja
* **CSS-Klassen für Animationen laden (optional)**: ja
* **CSS "max-width"-Klassen (optional)**: ja
### Beta-Features
Darüber hinaus haben wir eine spannende Beta-Funktion aktiviert:
* Tab "Weiteres"
* Bereich "Beta"
* Abschnitt "Top-Navigation Flyout"
* **Icon für externe Links anzeigen**: ja
***
Dies sind die Konfigurations-Änderungen in den ThemeWare® Demoshops.
Stand 01/2025
# Fonts
In this section you will find many useful instructions around the topic **fonts**.
Before starting with the font configuration we recommend you to have a look at our **video tutorial**. In the video "[Configuring fonts](/knowledge-base/introduction/configuring-fonts)" we explain important basics.
#### Tutorials in this section
* [Embedding fonts locally](/knowledge-base/tutorials/fonts/embedding-fonts-locally) – store your own or purchased fonts on your web server
* [Embedding fonts locally using the ThemeWare® Customizing Plugin](/knowledge-base/tutorials/fonts/embedding-fonts-locally-using-the-themeware-customizing-plugin) – the same route, but without a template customisation of your own
* [Importing Google Fonts](/knowledge-base/tutorials/fonts/importing-google-fonts) – load fonts through the Google Fonts API
#### Basics and background
* Basic knowledge: [Font configuration](/knowledge-base/basic-knowledge/font-configuration) – webfont, fallback fonts, font weight and size adjustment
* Knowledge: [Google Fonts](/more-knowledge/google-fonts) – why the Google Fonts API is a data protection concern and which options you have
{% hint style="success" %}
**Tip**: ThemeWare® ships 15 fonts that are loaded from your own web server. For those you do not need any of the tutorials above – you simply enter them in the font configuration.
{% endhint %}
Which fonts these are, which font weights they come with and what they look like is documented in the ThemeWare® manual:
{% embed url="" %}
ThemeWare® Manual => Fonts
{% endembed %}
# Embedding fonts locally
In this tutorial, you will learn how to self-host fonts and embed them manually.
In this article you will learn how to self-host **your own fonts** or **Google Fonts** respectively how to store them locally on your webserver and how to embed them in your Shopware 6 shop (self-hosted).
{% hint style="warning" %}
**Important**: In the Shopware 6 Cloud, no individual customizations are currently possible!
{% endhint %}
## Preface
In order to easily deposit the font files and the corresponding CSS customizations you should use a separate extension (plugin or app) for individual customizations.
* Please check if there already exists a suitable extension in the [Shopware Community Store](https://store.shopware.com/en/extensions/?p=1\&o=12\&n=21\&c=2069\&shopwareVersion=6).
* Alternatively, you may use the following manual method.
{% hint style="danger" %}
**Attention**: Never edit original files of Shopware or any extensions (plugins, apps or themes)!
{% endhint %}
## Manually embedding fonts
The easiest way is to provide the files in the folder "public" of your Shopware installation.
### 1. Downloading the required Google Fonts
In our example we wish to use the Google font "Titillium Web" for text and headlines in a font weight of "400" and "600". In order to download the fonts, we recommend the free service [google-webfonts-helper](https://gwfh.mranftl.com/fonts).
1. Look for the desired font in the upper left and select it (e.g. "Titillium Web").
2. Specify the required font weights under "**2. Select styles**". (e.g. regular/400 and bold/600)\

3. As folder prefix under "**3. Copy CSS**" you can leave it at "../fonts/".\

4. Download the ZIP archive via the button.\

### 2. Uploading and embedding fonts on the server
1. Unzip the ZIP archive and upload the fonts via FTP to the folder "**Fonts**".\
Folder path: `public/fonts/`
2. Switch to the folder "**css**" and create the file "**fonts.css**"\
Folder path: `public/css/`
3. In "fonts.css" copy and paste the CSS instructions of the fonts from section "**3. Copy CSS**". Additional fonts can easily be added under the CSS codes previously embedded. 
4. Save the change to the fonts.css file and upload it again if necessary.
### 3. Configuring ThemeWare®
1. Open ThemeWare® in the Theme Management and switch to the Tab "Layout" => Block "Typography":
1. Enter your font in the Section "**Text**" and/or "**Headlines**". (e.g. "'Titillium Web', sans-serif")
2. Enter your font weights in the Section "**Font weight**" (light, normal, bold). (e.g. 400, 400, 600)
3. Deactivate the option "**Import Google Fonts**" in order not to load the fonts from Google servers.
2. Now switch to the Tab "Others" => Block "Expert settings" => Section "CSS file":
1. Enter the path to your "fonts.css" into the field "**External CSS file**". (e.g. "yourshop.com/css/fonts.css")
3. Check whether the "Expert mode" (Tab "Others" => Block "Expert settings") is activated so that the CSS file is loaded.
4. Save the settings in order to compile the current theme and activate changes in the storefront.
5. The desired font should be available in the storefront now.
{% hint style="info" %}
**Tip**: Check in the plugin settings ("Extensions" => "My extensions" => "Themes" => "ThemeWare® ...") whether the "Debug mode" is deactivated so that the CSS file is loaded.
{% endhint %}
### 4. Completion
* Check whether fonts are no longer loaded via the Google Fonts API.
# Embedding fonts locally using the ThemeWare® Customizing Plugin
In this tutorial, you will learn how to self-host fonts and embed them using the "ThemeWare® Customizing Plugin.
This article explains how you can self-host **your own fonts** or **Google Fonts** respectively how to store them locally on your webserver and how to integrate them into your Shopware 6 shop (self-hosted) using our free "ThemeWare® Customizing Plugin".
{% hint style="info" %}
**Note**: Creating a ThemeWare® duplicate is not necessary for template customizations.
{% endhint %}
{% hint style="warning" %}
**Important**: Currently, no individual customizations are possible in the Shopware 6 Cloud!
{% endhint %}
## Introduction
In order to easily deposit the font files and the corresponding CSS customizations you should use a separate extension for individual customizations.
* Please check whether there already is a suitable extension in the [Shopware Community Store](https://store.shopware.com/en/extensions/?p=1\&o=12\&n=21\&c=2069\&shopwareVersion=6).
* Alternatively, you may use the following method with the "ThemeWare® Customizing Plugin".
You will find all information concerning the "ThemeWare® Customizing Plugin", the installation and the download link in the following article:
{% content-ref url="/pages/H9MMWI0BvCOdzt2ujhpr" %}
[ThemeWare® Customizing Plugin](/more-knowledge/themeware-tools/themeware-customizing-plugin)
{% endcontent-ref %}
{% hint style="danger" %}
**Attention**: Do Never edit original files of Shopware or any extensions (plugins, apps or themes)!
{% endhint %}
## Embedding fonts manually
### 1. Preparing extension
1. Upload the zip file of our extension via the Shopware 6 extension manager
2. Then install and activate the extension
### 2. Downloading the required Google Fonts
In our example we would like to use the Google font "Titillium Web" for text and headlines in a font weight of "400" and "600". In order to download the fonts, we recommend the free service [google-webfonts-helper](https://gwfh.mranftl.com/fonts).
1. Look for the desired font in the upper left and select it (e.g. "Titillium Web").
2. Enter the required font weights under "**2. Select styles**". (e.g. regular/400 and bold/600)\

3. Specify as folder prefix under "**3. Copy CSS**" the path `/bundles/tcinncustomizing/fonts/`\

4. Download the ZIP archive via the button\

{% hint style="success" %}
**Tip**: If the integration does not work with the path specified under 3., please add the following variable `#{$sw-asset-public-url}` before the path.
**Example**:
`#{$sw-asset-public-url}/bundles/tcinncustomizing/fonts/`
{% endhint %}
### 3. Uploading fonts to the server and embedding them
1. Unzip the ZIP archive and upload the fonts via FTP to the plugin folder "**fonts**".\
Folder path: `custom/plugins/TcinnCustomizing/src/Resources/public/fonts/`
2. Open the file "**base.scss**"\
Folder path: `custom/plugins/TcinnCustomizing/src/Resources/app/storefront/src/scss/`
3. Deposit the CSS instructions of the fonts from section "**3. Copy CSS**" into the "base.scss" using copy and paste. Additional fonts can easily be added below the previously included CSS codes.\
.png?alt=media)
4. Save the change of the file "base.scss" and upload it again if necessary.
### 4. Configuring ThemeWare®
* Open ThemeWare® in the Theme Management and switch to the Tab "Layout" => Block "Typography" :
1. Enter your font in the "**Text**" and/or "**Headlines**" section. (e.g. "'Titillium Web', sans-serif")
2. Enter your font weights into the section "**Font weight**" (light, normal, bold). (e.g. 400, 400, 600)
3. Deactivate the option "**Import Google Fonts**" in order not to load the fonts from Google servers.
* Save the settings in order to compile the current theme and changes will be transferred to the storefront.
### 5. Loading fonts into the storefront
* In order to load the fonts into the storefront, please deactivate the "ThemeWare® Customizing Plugin" once and activate it again afterwards.
* The desired font should be available in the storefront now.
> As of: Shopware v6.5.0
***
## For example
For the Font "Roboto Condensed", the embedd could be as following:
```scss
// Roboto Condensed
@font-face {
font-family: 'Roboto Condensed';
src: url('#{$sw-asset-public-url}/bundles/tcinncustomizing/fonts/static/RobotoCondensed-Light.ttf');
font-optical-sizing: auto;
font-style: normal;
font-weight: 300;
font-display: swap;
}
@font-face {
font-family: 'Roboto Condensed';
src: url('#{$sw-asset-public-url}/bundles/tcinncustomizing/fonts/static/RobotoCondensed-Regular.ttf');
font-optical-sizing: auto;
font-style: normal;
font-weight: 400;
font-display: swap;
}
@font-face {
font-family: 'Roboto Condensed';
src: url('#{$sw-asset-public-url}/bundles/tcinncustomizing/fonts/static/RobotoCondensed-Bold.ttf');
font-optical-sizing: auto;
font-style: normal;
font-weight: 700;
font-display: swap;
}
@font-face {
font-family: 'Permanent Marker';
src: url('#{$sw-asset-public-url}/bundles/tcinncustomizing/fonts/static/PermanentMarker-Regular.ttf');
font-optical-sizing: auto;
font-style: italic;
font-weight: 400;
font-display: swap;
}
```
> As of: Shopware v6.6.6
# Font configuration
{% hint style="info" %}
**Note**: This article is work in progress.
{% endhint %}
# Importing Google Fonts
In this tutorial you will discover how to import Google Fonts.
ThemeWare® provides you with the option of importing Google Fonts automatically.
{% hint style="danger" %}
**Disclaimer**: The information in this article is of a general nature and cannot replace specific legal advice. Before using font APIs such as Google Fonts, be sure to seek legal advice regarding the General Data Protection Regulation (GDPR)!Selecting and configuring fonts
{% endhint %}
1. Choose a [Google Font](https://fonts.google.com/) of your preference
2. Click the "**+ Select this style**" button next to a style of the font. (1)
3. An offcanvas element "**Selected family**" will open.
4. In the paragraph "Use on the web" you will find the section "**CSS rules to specify families**"
5. There you will find a CSS instruction for the selected font (2) (e.g. `font-family: 'Open Sans', sans-serif;`).
6. Select the font and the fallback font and copy both into the configuration field for the ThemeWare® font (e.g. 'Open Sans', sans-serif')
You can use the same font for the "Text" and the "Headlines". In case you want to use different fonts, repeat the steps for the other font.
#### Screenshots

## Configure font weight
In the configuration fields "Font weight for Google Fonts (Text)" and "Font weight for Google Fonts (Headlines)" you can define which font weight should be imported. Here you have to check which font weights are possible (depending on the font).
**Important**: Make sure that the desired font weights are available in all selected fonts. For example, if you want to use a font weight of 300 for "light", all fonts you are going to import must support a font weight of 300.
{% hint style="success" %}
**Tip**: Please also adjust the general configuration for font weights.
{% endhint %}
## Importing Google Font(s)
To make sure that the fonts are being imported, ThemeWare® offers the configuration "Import Google Fonts" in the section "Google Fonts". Please select the option "Yes" here.
Now the desired fonts are being imported via the Google Fonts API and are available to all visitors.
{% hint style="danger" %}
**Important**: We recommend that you integrate Google Fonts locally and not import them via the Google Fonts API. Before using font APIs such as Google Fonts, be sure to seek legal advice regarding the General Data Protection Regulation (GDPR)!Screenshots
{% endhint %}

{% hint style="info" %}
**Note**: You can find more information about "Google Fonts in ThemeWare®" in the ThemeWare® Manual: [Google Fonts](https://knowledge.themeware.design/more-knowledge/google-fonts).
{% endhint %}
***
#### Further information
* Tutorial: [Embedding fonts locally](/knowledge-base/tutorials/fonts/embedding-fonts-locally)
* Tutorial: [Embedding fonts locally using the ThemeWare® Customizing Plugin](/knowledge-base/tutorials/fonts/embedding-fonts-locally-using-the-themeware-customizing-plugin)
# Header
# Configuring the Shopping Experiences Header
In this tutorial you will learn all about the ThemeWare® Shopping Experiences Header.
In the so-called **ThemeWare® Shopping Experiences Header**, the header overlays the Shopping Experience on the main page or on selected category pages. This is a configurable effect to enable a particular look in ThemeWare®.
In themes like [ThemeWare® Exquisite](https://demo.themeware.design/exquisite/en/), [ThemeWare® Lights](https://demo.themeware.design/lights/en/) or [ThemeWare® Outdoor](https://demo.themeware.design/outdoor/en/) the "Shopping Experiences Header" is already configured. The corresponding look you may have a look at in the corresponding demo shops:
* [ThemeWare® Exquisite](https://demo.themeware.design/exquisite/en/)
* [ThemeWare® Lights](https://demo.themeware.design/lights/en/)
* [ThemeWare® Outdoor](https://demo.themeware.design/outdoor/en/)
## 1. Theme configuration
You are able to de-/activate the "Shopping Experiences Header" via the ThemeWare® configuration.
The corresponding configuration is available in the Tab "Header" => Block "Shopping Experiences Header" => Field "Shopping Experiences Header".
1. **Option "don't apply (default)":**
* This option virtually is the default header representation.
* The Shopping Experience is placed after the header. The header **does not overlay** the Shopping Experience.
2. **Option "apply (Header overlays the Shopping Experience)":**
* This option is the "ThemeWare® Shopping Experiences Header".
* The Shopping Experience will be pushed behind the header, in order that the header **overlays** the Shopping Experience.
* For the perfect look of the "Shopping Experiences Header" it is important to configure the background color of the actual header "transparent".
* Furthermore, you may create a separate logo for the "ThemeWare® Shopping Experiences Header": Tab "Layout" => Block "Media" => Field "Logo (Shopping Experiences Header)".
## 2. Shopping Experience
In order that the "ThemeWare® Shopping Experiences Header" can develop its full effect, the Shopping Experience on your main page needs a suitable Shopping Experience element in the first place. Especially suitable are blocks like "Image, full-sized" or "Image slider" out of the block category "Image".
The images used should be sufficiently large (e.g. 1920x1024px) and thus compressed as well as possible. In addition, you should choose or create motifs in which as little as possible "happens" in the upper area of the image, in order that the logo, buttons and navigation are still easily recognizable.
**Screenshots**
 
# Highlighting a category in the navigation
With ThemeWare® you highlight a single category in the top navigation with colour – for example your sale, new arrivals or promotion category. This way you deliberately draw your customers' attention to the menu item that matters most to you.
{% hint style="info" %}
**Note**: A category is only highlighted if the "Highlight category" custom field is set to "yes" for it. The theme configuration only controls the appearance of the highlighting.
{% endhint %}
***
## Requirements
* a category you want to highlight in the top navigation
* the "Top navigation" layout type in the header (the highlighting does not apply to the "Entry point main navigation")
***
## Step 1: Define the appearance of the highlighting
> "Theme Manager" => your ThemeWare® theme => "Header" tab => "Top navigation" block => "Link (highlighted)" section
Define here how a highlighted menu item should look – for example via the "Text colour (highlighted)", "Background colour (highlighted)" and "Icon colour (highlighted)" (each also for the @hover and @active state). Save your changes.
***
## Step 2: Highlight the category
> "Catalogues" => "Categories" => select category => "Custom fields"
Set the option in the **"Highlight category"** custom field to **"yes"** and save the category.
{% hint style="info" %}
**Note**: You will find the custom field in the category editor on the "General" tab. Repeat this step for every additional category you want to highlight.
{% endhint %}
***
## Result
The selected category now appears in the chosen look in the top navigation. If the highlighting does not show up, clear the Shopware cache once.
{% hint style="success" %}
**ThemeWare® Tip**: Use the highlighting sparingly – a single highlighted menu item catches the eye far more than several at once.
{% endhint %}
***
## Further information
You can find all configuration options and the custom field in detail in the ThemeWare® manual:
{% embed url="" %}
ThemeWare® Manual ⇒ Highlight category
{% endembed %}
# Setting up the Mega Menu
With ThemeWare® you extend the flyout of your top navigation with up to three teasers featuring an image, text and link. Highlight promotions, topic worlds or top products right in the mega menu and guide your customers straight from the navigation to the matching destination.
{% hint style="info" %}
**Note**: The teasers are maintained per category via custom fields and appear next to the subcategories in the "ThemeWare® Flyout" as soon as you select the matching flyout type in the theme configuration.
{% endhint %}
***
## Requirements
* a category in the top navigation whose flyout you want to extend with teasers
* one to three images for the teasers in the Shopware media manager
* optionally the target URLs (links) for the teasers
***
## Step 1: Choose the flyout type in the theme
> "Theme Manager" => your ThemeWare® theme => "Header" tab => "Top navigation flyout" block
The **"Top navigation flyout"** field offers several ways to display the submenus (see the "More flyout modes" section below). For the teasers, choose **"ThemeWare® Flyout with teasers"** and save your changes.
***
## Step 2: Add the teasers to the category
> "Catalogues" => "Categories" => select category => "General" tab => "Custom fields" block => "Flyout (... Pro)" custom field set
Fill in the following custom fields per teaser (up to 3 teasers are available):
* **Flyout teaser 1–3 – Image** – the teaser image from the media manager
* **Flyout teaser 1–3 – Text** – the text below the image
* **Flyout teaser 1–3 – Link** – the target URL; the whole teaser is clickable
Save the category.
{% hint style="info" %}
**Note**: Leave the image empty to hide a teaser. The image's alternative text is taken from the media manager.
{% endhint %}
***
## Result
When you open the category's flyout in the top navigation, the teasers now appear next to the subcategories. If nothing shows up, clear the Shopware cache once.
{% hint style="success" %}
**ThemeWare® Tip**: Use meaningful alternative texts in the media manager – they improve accessibility and SEO. If you want to set the flyout type differently for a single category, use the category custom field "Top navigation flyout".
{% endhint %}
***
## More flyout modes
The "Top navigation flyout" field generally controls how the submenus of your top navigation are displayed – the teasers are just one of several modes:
* **Shopware default** – the native Shopware navigation (without the ThemeWare® flyout)
* **ThemeWare® Flyout** – the standard flyout with the subcategories
* **ThemeWare® Dropdown** – the submenus as a compact dropdown
* **ThemeWare® Flyout with cards** – shows the direct subcategories as image cards
* **ThemeWare® Flyout with sidebar** – flyout with a side navigation bar
* **ThemeWare® Flyout with teasers** – the flyout with teasers described in this guide
{% hint style="info" %}
**Note**: You set the mode globally in the theme configuration. Using the category custom field "Top navigation flyout" you can override it per category – this only takes effect if the global setting is not "Shopware default".
{% endhint %}
### Layout examples
Flyout
Dropdown
Cards
Sidebar
Teasers
***
## Appearance of the menu items
Regardless of the mode, you decide how the individual menu items in the submenu look.
> "Theme manager" => your ThemeWare® theme => "Header" tab => "Top navigation flyout" area => "Basic configuration 'ThemeWare® Flyout'" section => "Style" field
* **List (Shopware 6)** – a line to the left of the categories
* **List** – arrows in front of the categories
* **List in columns (Shopware 5)** – the arrangement from Shopware 5's "Advanced Menu"; only applies to the "ThemeWare® Flyout" mode
* **Buttons** – every category gets its own surface with rounded corners
The dropdown has its own selection in the "Basic configuration 'ThemeWare® Dropdown'" section: "List", "Buttons (compact)" and "Buttons".
You set the colours of the surfaces and the glass effect in the same area in the "Colour configuration" section – via "Background colour (menu items)" including @hover and @active as well as "Glass effect \[px] (panel)".
{% hint style="success" %}
**ThemeWare® tip**: The glass effect blurs the page content behind the submenu. It only becomes visible once you choose a semi-transparent colour for the "Background colour (panel)" – a value of 10 is a good starting point.
{% endhint %}
***
## Further information
You can find all layout types and styles with example images in the ThemeWare® manual:
{% embed url="" %}
ThemeWare® Manual ⇒ Mega Menu (Flyout)
{% endembed %}
All configuration fields of the flyout in detail:
{% embed url="" %}
ThemeWare® Manual ⇒ Top navigation flyout
{% endembed %}
The teaser custom fields in detail:
{% embed url="" %}
ThemeWare® Manual ⇒ Flyout
{% endembed %}
---
[Next Page](/llms-full.txt/1)